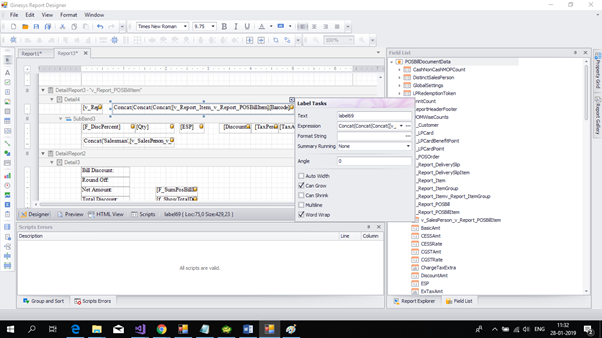
The new user end report feature XtraReport has been released with Ginesys Version 11.147.0. This step by step guide helps us to create a report from scratch in XtraReport.
Pre-requisites:
- GinesysReportDesigner.exe must be present in the Shared Location at HO.
...
- For example, if Ginesys is installed in C: drive then you can find the GinesysReportDesigner.exe in the following location:
...
- C:\GSL\GINESYS12\Shared\GinesysReportDesigner.exe
Step-by-step guide:
...
...
- Run
...
Written By: Jagreeta De
...
- GinesysReportDesigner
...
- .
...
- exe from the shared location by double-clicking on the .
...
2. Ginesys has provided us an end user report designer. Let’s Create a new report.
New Report: Need to create File → New
Existing Report: Need to click File → Open
...
- exe file
- New report can be created from File > New; File > Open will open an existing report.
- Provide a name of the report (
...
- E.g. :POSInvoiceNew).
...
- Let's suppose you create a <POSInvoice.xml> from the ReportDesignHelper at POS
...
- and mail it to the report designer
...
- providing the following path for Report properties > XML Data Path > Select the same XML file.
...
...
- You can see all the datasource or the views
...
- or tables on the right hand side that is in the Field-List.
...
...
- Put the header related information in the ReportHeader band.
...
- Observe that there is a predefined Detail band present while creating a new report.
...
- You can put detail heading in that band.
...
...
- Right click in the detail band
...
- to see a context-menu.
...
- Select the Insert Detail Report option from the context menu and you can see the datasource details on the right hand side
...
...
- being reflected in he new list that opens beside the context-menu.
- Select the required datasource by clicking on it. For example we click on the “V_Report_POSBillItem” which is the bill item detail section.
...
...
- You can also put in other datasources
...
- (like MOP, DeliverySlip etc) as per your requirement
...
- You can add calculated fields as per requirement.
- Add a text object in that particular band.
- Right click on the down arrow of that text object,
...
- and a new context menu which contains a property called Expression.
- If you click the button of that property an Expression Editor will be opened. Put a proper formula as required.
...
...
- You can put the footer information in the
...
- Report Footer section.
...
- Design time data can be displayed by clicking Preview Button.
...
- You can change the aesthetic part of the report and different parts of report by setting different properties from the Property window.
...
- Page-setup , Paper-kind and printer related information can be given from the Report properties.
...
These are the basic steps to create a report using Xtrareport. After finishing the design we need to follow some more steps before allocation to sites.
...
- Run Ginesys Report Template
...
- Add or edit report layout that you have already created (.rpt/.repx).If you want to redesign your layout then export the layout from report
...
- layout list and design it again.
...
- Go to
...
- Ginesys Web and allocate the layout created
...
- through Report Layout window to stores.
- This will be done by the master allocation process of allocation group displayed below -
- Go to Retail Management > Setup > Allocation Group - Report Layout (tab) and Add a new allocation or Edit an existing allocation by double-clicking it.
- Select the appropriate layout from the list of Available Report Layouts and click on the Right Arrow (→) to move it to Allocated Report Layouts.
- Save the record.
...
- Run the sync process at HO and POS.
...
- In the POS > Administration module,
- Click on POS Terminals
- Assign the report-layout allocated to stores
...
- to a terminal by clicking on selected report layout in Report tab of Terminal window.
- to a terminal by clicking on selected report layout in Report tab of Terminal window.
...
- Restart POS and print the allocated report from POS.
...
HOPE YOU HAVE ENJOYED REPORTING
...
Related articles
| Filter by label (Content by label) | ||||||||||||||||||
|---|---|---|---|---|---|---|---|---|---|---|---|---|---|---|---|---|---|---|
|
...


