Prerequisites- The users' role must have access to the Add app operation in the Delivery-Adhoc feature in Sales & Distribution - Operation - Packing through Roles in Ginesys Web - Admin - Security.
- Document Numbering Scheme must be present for the module.
- The masters must be present - Item, Customer, Agent, etc.
User needs to tick the security - Allow rate change in Delivery Challan, to allows change Basic Rate in Delivery Challan. User needs to tick the security - Allow Discount in Delivery Challan Adhoc, to allows Discount change. - subsequent action to be taken and Allow Auto Creation of Sales Invoice and Transfer Outto get the provision of creating Auto Sales Invoice / Transfer Out directly from Delivery Challan.
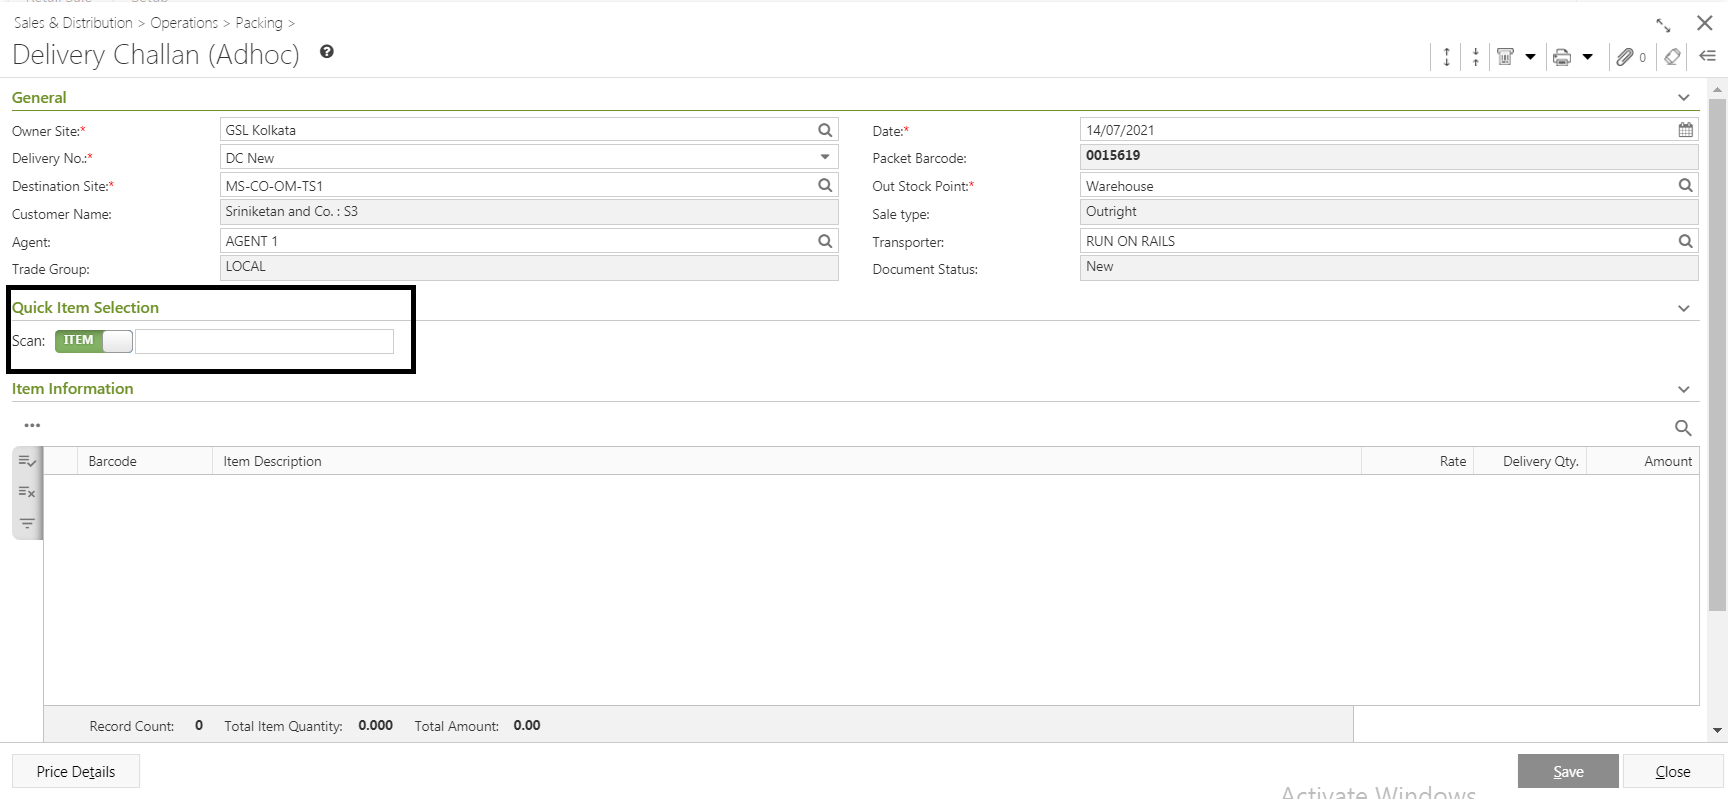
Step-by-step guideThe process is divided into the following steps: - Go to Ginesys Web > Sales and Distribution > Operations > Packing > Delivery - Adhoc.
- Delivery Challan (Adhoc) module will open.
- All the previously created DCs will be listed here.
- Click on Add button.
- Delivery Challan (Adhoc) window will open.
 - You will get group of icons at the top right corner of the window.

The icons name from left to right are - Expand All, Collapse All, Print Barcode, Print Document Report, Attachments, Clear Form and Open Side Panel.
- Expand All: Clicking on this icon, all the sections will be Expand if they are collapsed.
- Collapse All: Clicking on this icon, all the sections will be Closed if they are expanded.
- Print Barcode: Clicking on the Down Arrow beside this icon, you will get Print Preference option. This option is used to print barcode.:
- Print Document Report: Clicking on the Down Arrow beside this icon, you will get Print Preference option with already created Report File Template. This option is used to print document.
- Attachments: You can Upload some required documents from this option.
- Clear Form: Clicking on this icon, you can Clear all the data already entered.
- Open Side Panel: Clicking on this, you will get the details of the current Delivery Challan as follows:
- Document Summary: In this section you will get the details of Selected Items, Sale Type, Owner Site, Modified by etc.
- Customer Details: You will get the Selected Customer Details like Address, Contact Details, Tax Region, Credit Limit, Overdue Amount etc.
- Customer Statistic: This section describes the Delivered not Invoiced amount, Outstanding Amount, Last Invoice Date etc.
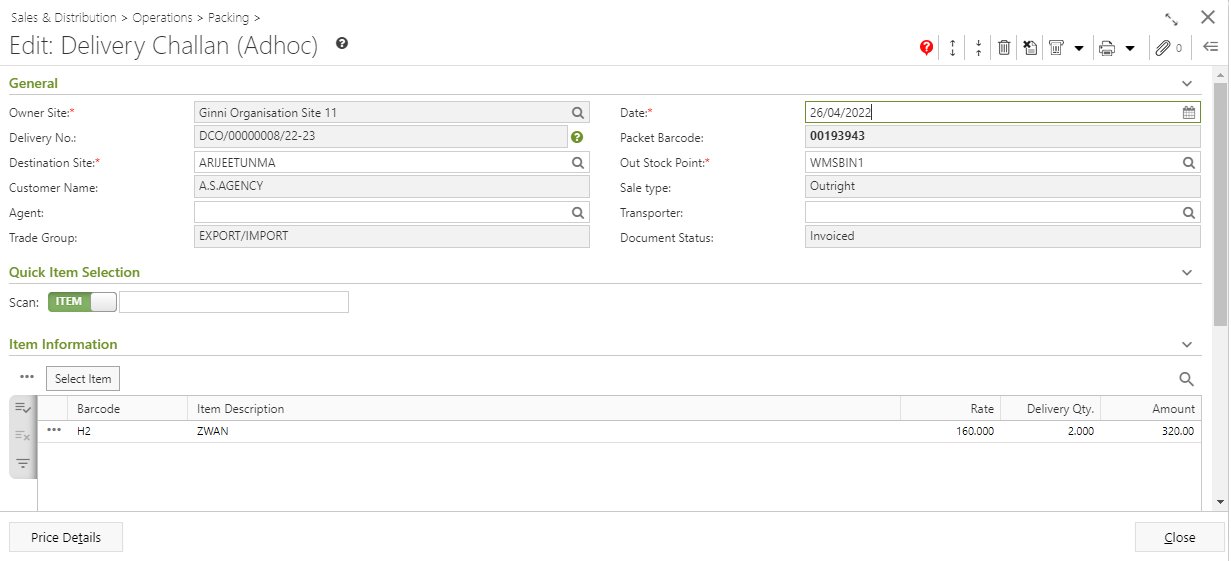
- You will get five sections - General, Quick Item Selection, Item Information, User Defined Fields and Others.
- General:

- Select the Owner Site (Mandatory Field) for which you want to create the Delivery Challan.
- Select a Document Numbering Scheme, already created in the master, from the drop down list Delivery No. (Mandatory Field).
Packet Barcode field will be generated automatically at the time of opening the Delivery Challan(Adhoc) window in the Add mode. This is a read only field.
| Tip |
|---|
Note: First 3 characters will be company code & last 5 characters will be DCCODE. |
- Select the Destination Site (Mandatory Field) from the Destination Site Pop-Up form. Transporter, Trade Group, Agent, Customer Name and Sale Type, Out Stock Point will be populated as per Destination Site selection. You can change the Transporter and Agent from the Transporter and Agent Pop-Up window respectively.
- System date will be populated in the Date field (Mandatory Field). You can change the date as per your requirement. You can only select the past date from the system date but not any future date.
- Document Status will be populated automatically.
- Quick Item Selection:
Select the Scan type - Barcode or Set. You can scan item barcode or set barcode directly from this field for Adhoc Delivery Challan. Enter the barcode of the item or set into the text box and press enter. The scanned items or set will be listed in the Item Information section. | Note |
|---|
Pre-requisites for Set selection- The profile setting - Allow Set item selection in Receipts must be selected.
You need to select whole set items or need to remove all the items from set. You cannot select partial items from set. |
- Item Information:
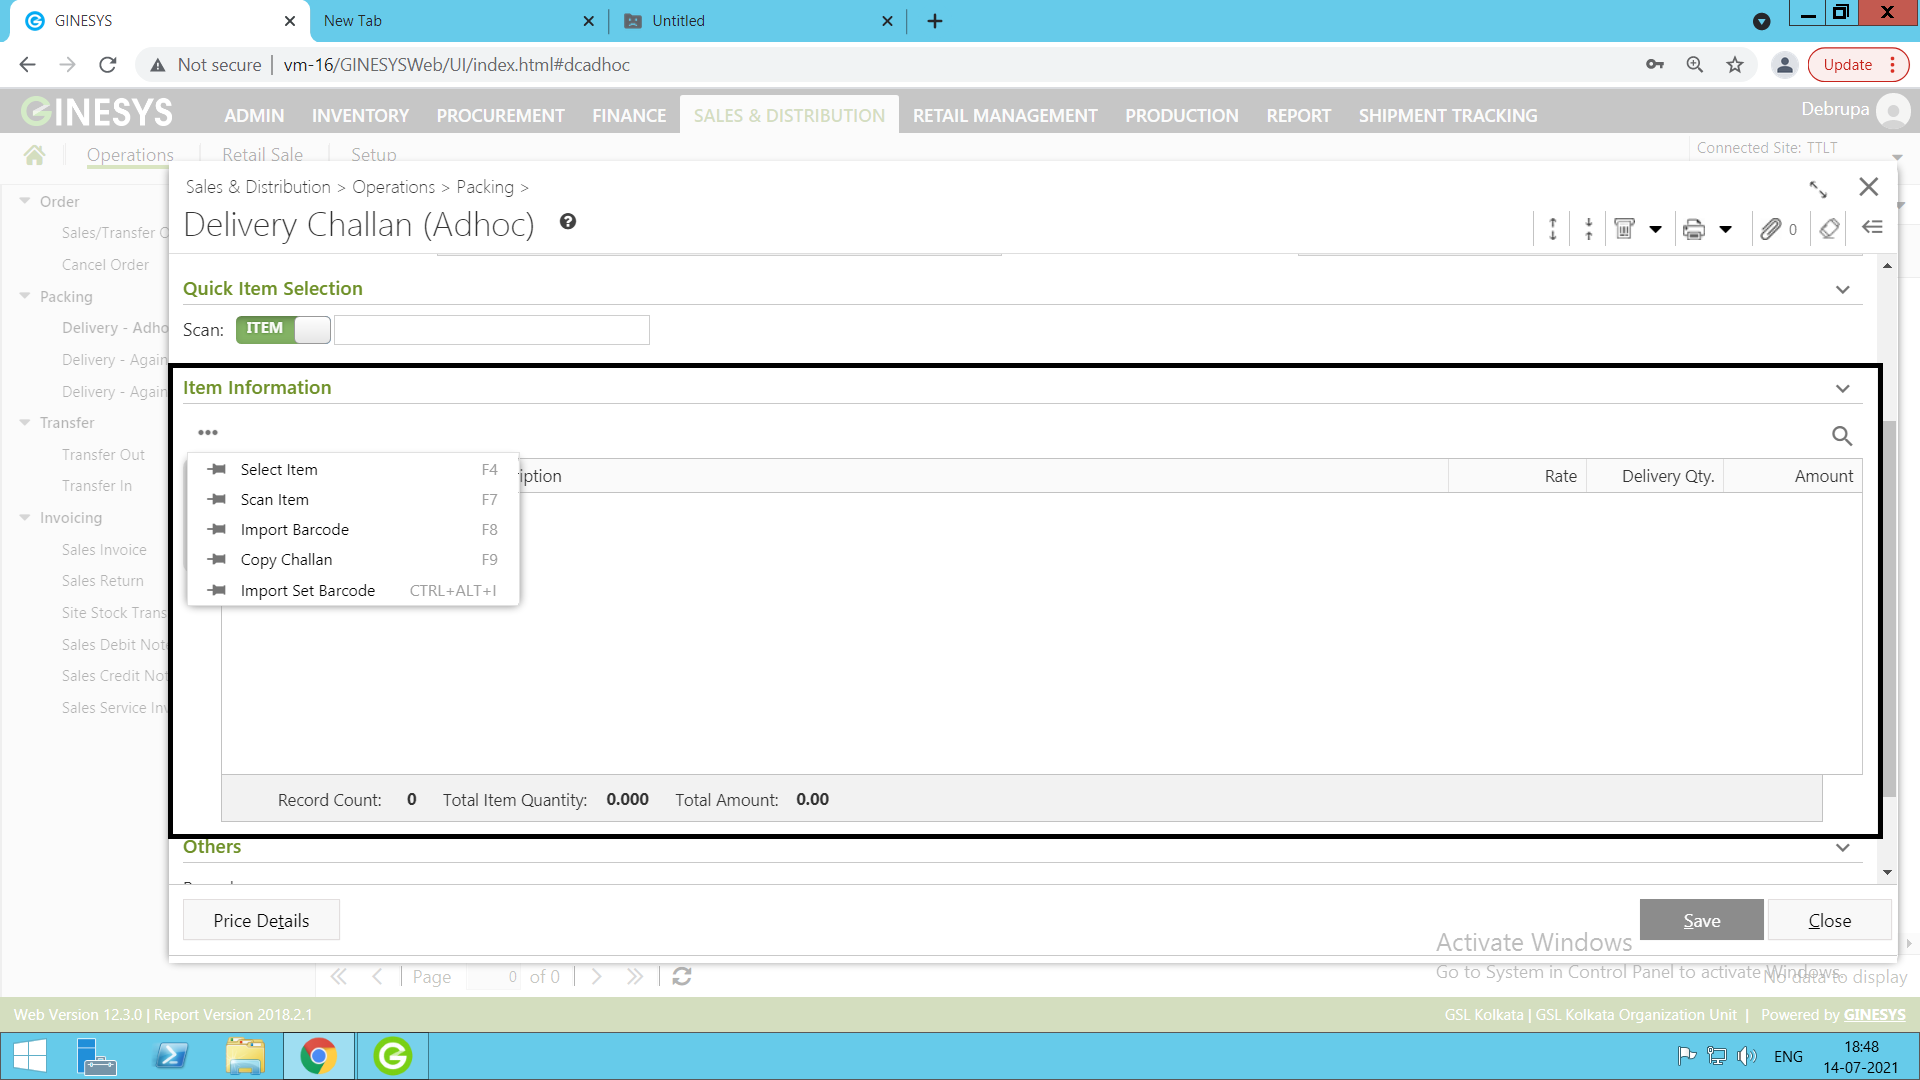
You need to add items in the Delivery Challan by using Search Item, Scan Item, Import Barcode or Copy Challan.
| Tip |
|---|
| title | Duplicate Item Selection |
|---|
| Note: If a duplicate Adhoc Item is entered through any item selection mode except for scan, a confirmation window named Duplicate Item opens. There will be three options in Operation - Append, Overwrite and Discard. - If you select Append, the quantity of the existing item would be Increased.
- If you select Overwrite, the previous quantity will be Removed and the new quantity will be displayed.
- If you select Discard, there will be no change in the previous quantity.
If you enter duplicate item through scan item mode, the quantity of the existing item will be increased. |
- Search Item: This process will search the items from the Item Master according to the search criteria.
- Scan Item: You can directly Scan the Barcode to add items.
- Import Barcode: The Import Barcode feature allows to populate items using the .csv or .txt files.
Copy Challan: Only item details of existing challans can be copied and the items included to create new challans.
| Tip |
|---|
| Note: The given conditions are followed to display the list of Challans to be copied: - Only receipt made in the current financial year will be displayed.
- Only receipt made from the connected OU name will be displayed.
- Only receipt made from the connected site will be displayed.
- Challan number once selected in a particular Delivery Challan will not be displayed in the list for further selection.
- Only challans which are not made extinct will be displayed.
|
| Note |
|---|
Note: You will get Negative Stock Alert, if stock of item in the grid is less than delivery quantity for the selected stock point. - If items added or removed or quantity is changed then the stock will be checked.
|
Selected items details will be populated with Barcode, Item Description, Rate, Delivery Qty. and Amount. | Info |
|---|
Note: Rate column will not be populated for Consignment sale type. |
- If you click on the
 Image Modified button left side of the populated item, you will get Delete Record and View Properties in the drop down list. Image Modified button left side of the populated item, you will get Delete Record and View Properties in the drop down list. - Delete Record: You can delete the item from the item grid.
- View Properties: You can check the item details by clicking on this option. It will open the Item Master window but you cannot edit any details.
- Others:
 Image Modified Image Modified
- You can put in the Remarks for the Delivery Challan.
- If you click on the Price Details button, Price Details window will open.
- You can change the Basic Rate, Factor etc.
- Click on Ok after required changes.
- Now click on the Save button.
If the selected items have Negative or Zero stock, you will get a Warning - Negative Stock Alert! window. There are two options - Ignore and Cancel. If you click on Ignore, the Delivery Challan will be saved with negative stock. If you click on Cancel, then you will get back the Item Information section to remove the Item(s) and re-select item(s) without negative stock.
If the customer exceed the credit limit set in the Customer Master and if the Credit Verification Failure Alert Method is set as Warning, then you will get a alert message - "The Customer is either exceeding the Credit limit or the Overdue limit. Do you want to proceed?".
| Tip |
|---|
Note: The profile security - Credit Verification Failure Alert Method have following three value: - Stop: If profile value is set as Stop, then generate alert with options - Alert: "The Customer is either exceeding the Credit limit or the Overdue limit. Cannot Proceed!" and stop execution.
- Warning: If profile value is set as Warning, then generate alert message - "The Customer is either exceeding the Credit limit or the Overdue limit. Do you want to proceed?".
- Ignore: If profile value is set as Ignore, then do not get any message and proceed to save.
|
If you click on Proceed, the Delivery Challan will be generated and you will get a message - "Document <DC No.> saved successfully. Packet Barcode : <Packet Barcode No>."
After saving the Delivery Challan, you will get a Packet Panel beside the Panel Information. By default, the section to remain hidden before saving of a DC. In this panel, you will get the packet details like Packet No., Packet Barcode, No of Item(s) & Quantity. After opening Add mode, number of packets created without closing the Add mode, to be displayed one after another. Once the Add Mode is closed, this section will be cleared. | Tip |
|---|
Note: After saving one Delivery Challan, the Customer details section in the header part will remain same. You can create more than one Delivery challan for one customer. |
|