| Steps | Related resource |
|---|
1. | Download and extract Ginesys Report Kit
Download the Ginesys Report Kit compatible with Ginesys version from the link - Common Downloads Create a folder named GinesysReport, preferably within Ginesys installation directory GINESYS12 Extract the zip file in newly created GinesysReport folder Ensure the extracted report application folders should appear in GinesysReport folder's root.
Preferred path is <GINESYS Installed Drive>\GSL\GINESYS12\GinesysReport.
The adjacent figure shows the folder structure. | Anchor |
|---|
| Create-an-Application-Pool-for-Ginesys-Report-Module |
|---|
| Create-an-Application-Pool-for-Ginesys-Report-Module |
|---|
|
|  Image Removed Image Removed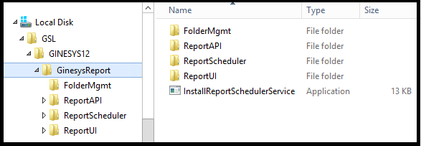 Image Added Image Added |
2. | Create an Application Pool for Ginesys Report Module - name it GinesysReportAppPool. Open IIS Manager by pressing on  Image Removed Image Removed Image Added Image Added + R and opening the Run window Then entering inetmgr In the left hand side Connections pane, expand the server node Right click the Application Pools, and click Add Application Pool. On the Add Application Pool dialog box, enter following information. Click OK
Name: GinesysReportAppPool .NET CLR Version: .NET CLR Version V4.x Managed Pipeline Mode: Integrated Start application pool immediately: Selected
| Detailed info: How To: Create an application pool on a Web server |
3. | Create three new applications in IIS | Anchor |
|---|
| Create-three-new-applications-in-IIS |
|---|
| Create-three-new-applications-in-IIS |
|---|
|
| Info |
|---|
NOTEIf Ginesys Reports is being configured on same server where Ginesys Application is installed, then Ginesys Web Applications and Ginesys Report Applications will appear under same site, here it will be Default Web Site if the installation as it is done following this guide. |
In IIS manager, right click on Default Web Site and click Add Application... Input details in Add Application window for three respective Applications as per following details
First application GINESYSReportUI
Alias: GINESYSReportUI Application Pool: GinesysReportAppPool (Select from the list) Physical Path: Path to the \GinesysReport\ReportUI
(e.g. D:\GSL\GINESY12\GinesyReport\ReportUI)
Second application GINESYSReportAPI
Alias: GINESYSReportAPI Application Pool: GinesysReportAppPool (Select from the list) Physical Path: Path to the \GinesysReport\ReportAPI
(e.g. D:\GSL\GINESY12\GinesyReport\ReportAPI)
Third application GINESYSImages
Alias: GINESYSImages Application Pool: DefaultAppPool (Select from the list) Physical Path: Ginesys image folder path, \Shared\ItemImage
(e.g. D:\GSL\GINESYS12\Shared\ItemImage)
| Detailed Info: How To: Add an application in IIS manager | Anchor |
|---|
| IISGINESYS-IMAGES |
|---|
| IISGINESYS-IMAGES |
|---|
|
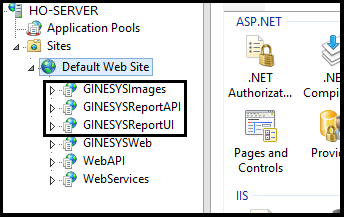
Sample Image of IIS Manager with Report Applications created.
 |
4. | Add permission on new Applications | Anchor |
|---|
| Add-permission-on-new-Applications |
|---|
| Add-permission-on-new-Applications |
|---|
|
On all three newly added applications, GINESYSReportUI, GINESYSReportAPI, GINESYSImages 'Full Control' access need to be given to 'IIS User' (IIS_IUSRS). Repeat the above steps for all three applications. Right click on each applications in IIS, click on Edit Permissions... It will open the Folder property, go to Security tab, click Edit Click Add... to add new permission Ensure the system name is selected in Locations.. field. In the box where to Enter the object names to select type IIS_IUSRS, then click Check Names. Click OK. In this windows, in Permission for IIS_IUSRS field, check the box under Allow beside Full Control. Click Apply and OK.
| Info |
|---|
IMPORTANTNote: Creation and usage of Application Pool Identities is entirely optional but recommended by Ginesys. |
On all three applications, GINESYSReportUI, GINESYSReportAPI, GINESYSImages GINESYSImages 'Full Control' access need to be given to 'IIS User' (IIS_IUSRS). To do this, Repeat the above steps for all three applications. | How to provide read and write access to Application Pool Identities |
5. | Modification of GinApps.Config | Anchor |
|---|
| Modification-of-GinApps.Config |
|---|
| Modification-of-GinApps.Config |
|---|
|
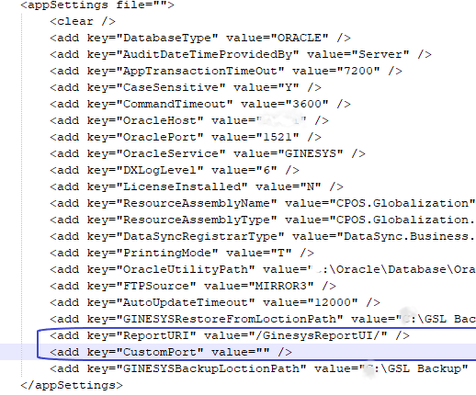
Keys need to be added in its configuration files on GINESYS Application Server (File location: C:\GSL\GINESYS12\Shared): Open GinApps.config in Notepad or any text editor. Find <appSettings tag in xml file and add the following two keys:
<add key="ReportURI" value="/GinesysReportUI/" />
<add key="CustomPort" value="" /> | Panel |
|---|
| panelIconId | 1f308 |
|---|
| panelIcon | :rainbow: |
|---|
| panelIconText | 🌈 |
|---|
| bgColor | #E6FCFF |
|---|
| Note: Custom Port needs to be provided only if the Ginesys Web Reports is using a Port other than the default port - 80
In " |
ReportURIReportURL" generally host name or IP need not be specified. |
| Info |
|---|
Note: In case of Ginesys Version earlier than 11.135.0 the following both the keys need to be incorporated and also host name or IP to specify in URLs:
<add key="ReportURI" value="http://<Machine name>/GinesysReportUI/" />
<add key="ReportApiURI" value="http://<Machine name>/GinesysReportAPI/Api.asmx" />
Using a non-default port was not supported in older version of Ginesys. |
|  |
6. | Starting up ASP.NET State Service | Anchor |
|---|
| Starting-up-ASP.NET-State-Service |
|---|
| Starting-up-ASP.NET-State-Service |
|---|
|
Open Services management console (Go to RUN > Type Services.msc > Enter) Double click on ASP.NET State Service Set Startup Type: Automatic Click on Start button Click on OK button to close the window. Close Services management console. |
|
7. | Install the Report Scheduler Windows Service: | Anchor |
|---|
| Install-the-Report-Scheduler-Windows-Service |
|---|
| Install-the-Report-Scheduler-Windows-Service |
|---|
|
Ensure that eWebReportsScheduler.xml is available in <GINESYS_Installed_Drive>\GSL\GINESYS12\GinesysReport\ReportScheduler. In case it is not available, find eWebReportsScheduler<Kit Version>.xml and rename it to eWebReportsScheduler.xml. Open Command Prompt (cmd) in Administration mode Run the following commands in command prompt, need to replace the angular brackets with the values specific to particular installation:
cd <GINESYS Installed Drive>\GSL\GINESYS12\GinesysReport
InstallReportSchedulerService GinesysReportInstallReportSchedulerService -install <GINESYS Installed Drive>\GSL\GINESYS12\GinesysReport\ReportScheduler |
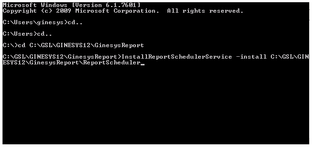 Image Removed Image Removed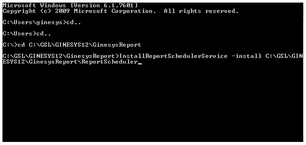 Image Added Image Added |
8. | Provide access to Report Module - | Anchor |
|---|
| Provide-access-to-Report-Module |
|---|
| Provide-access-to-Report-Module |
|---|
|
Go to the GINESYS WEB - ADMIN - Security - Roles Select the appropriate Role from the list and open it. Select Report module along with all sub-menus. Re-login in the assigned roles to gain access to the REPORT module.
| 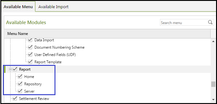 Image Removed Image Removed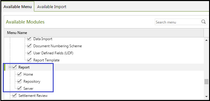 Image Added Image Added |
9. | Synchronize configuration of Ginesys Reports with Ginesys Application | Anchor |
|---|
| Synchronize-configuration-of-Ginesys-Reports-with-Ginesys-Application |
|---|
| Synchronize-configuration-of-Ginesys-Reports-with-Ginesys-Application |
|---|
|
|
|
10. | Grant appropriate Report role to user | Anchor |
|---|
| Grant-appropriate-Report-role-to-user |
|---|
| Grant-appropriate-Report-role-to-user |
|---|
|
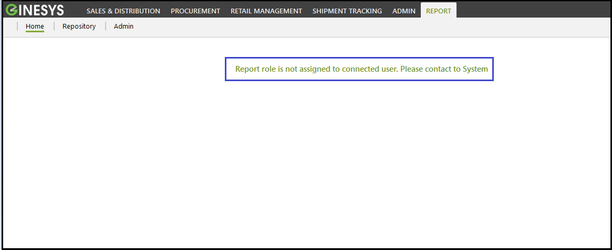
Go to GINESYS WEB - ADMIN - Security - Users Select the appropriate User from the list and open it. Select appropriate Report Role from the drop-down list. Save the changes made. Now users will be able to login and access Report module.
| Info |
|---|
a. Earlier there was only one field - Role - assigned to a user (GINESYS WEB - ADMIN - Security - Users). However, now there are two role related fields. The Role related to the application is now known as Menu Role and the one related to Report Module is known as Report Role. The Report Role field will be applicable only if the REPORT module is installed and the user needs to work with Reports. b. Two default Report Roles are provided in GINESYS - Power User and Operator. c. The functional levels of the report roles can be configured from GINESYS WEB - Report - Server - Roles. d. The Home tab will not show anything unless the Report Role is assigned. Check the attached image. |
|  |
11. | Verification for Database Connectivity | Anchor |
|---|
| Verification-for-Database-Connectivity |
|---|
| Verification-for-Database-Connectivity |
|---|
|
In the Report Server tab, under Data>Sources; Double click on GINESYS. Some setting details are shown on the right side (check attached image), click on the  icon beside icon beside Connection String and automatically the connection string is checked for validity. If valid the message displayed on the right is shown. | 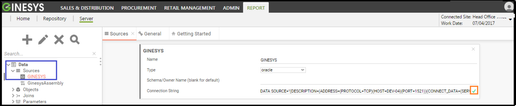 Image Removed Image Removed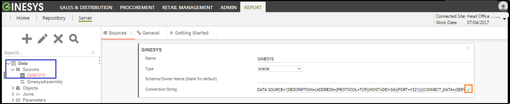 Image Added Image Added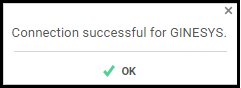 |
12. | Verification for Report Path Access | Anchor |
|---|
| Verification-for-Report-Path-Access |
|---|
| Verification-for-Report-Path-Access |
|---|
|
In the same location, under General>Main Settings; Some setting details are shown on the right side (check attached image), click on the icon beside Report Path and automatically the path is checked for validity. If valid the message is shown. | 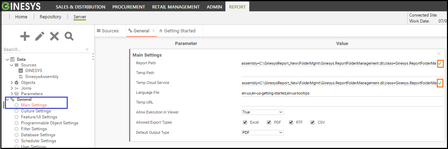 Image Removed Image Removed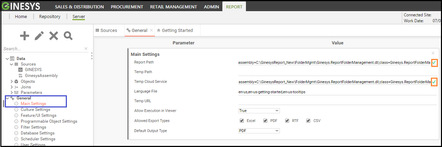 Image Added Image Added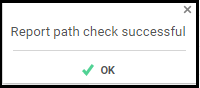 |
13. | Verification for Schedule Host Connectivity | Anchor |
|---|
| Verification-for-Schedule-Host-Connectivity |
|---|
| Verification-for-Schedule-Host-Connectivity |
|---|
|
In the same location, under General>Scheduler Settings; Some setting details are shown on the right side (check attached image), click on the icon beside Schedule Remoting Host and automatically the path is checked for validity. If valid the message is shown. Schedule Remoting Host format - <channel_type>://<machine>or<ipaddress>:<port> (<machine> or <ipaddress> of Report server and scheduler service must be in running state) Sample value - tcp://SERVERNAME:2001 | 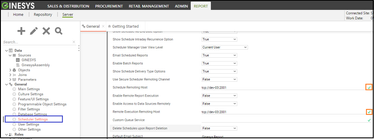 |
14. | Opening the Report > Home Now the Report Home should open without any issues. |  Image Removed Image Removed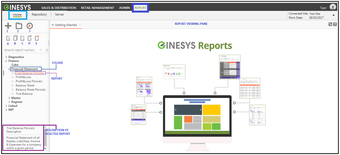 Image Added Image Added |
15. | Configuring the Repository Tab | Anchor |
|---|
| Configuring-the-Repository-Tab |
|---|
| Configuring-the-Repository-Tab |
|---|
|
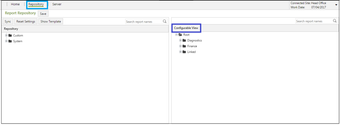
The report tree structure has to be created by the Admin user in the Repository tab. The report folders can be mapped by drag and drop Report folders from left side (Repository) into right side (Configurable View).
| Tip |
|---|
System Provided ReportsTo get the the System provided reports for required modules, drag the sub-folders under 'System' from left side into right side | warning |
IMPORTANT - Report Folder sequence| Warning |
|---|
Note: The Linked folder should be transferred to Configurable View right under the Root folder. The Linked folder is available under System folder in Repository. |
|  |
16. | Configure the Scheduler following the steps given - (Optional) | Anchor |
|---|
| Configure-the-Scheduler-following-the-steps-given |
|---|
| Configure-the-Scheduler-following-the-steps-given |
|---|
|
This step is only required if reports need to be scheduled to be send by auto-email. To configure the GINESYS Reports Scheduler Service API, edit the file ‘eWebReportsScheduler.xml’ in the folder where the scheduler service was installed. Location - <GINESYS Installed Drive>\GSL\GINESYS12\GinesysReport\ReportScheduler\eWebReportsScheduler.xml Set the following items - values within the brackets() are random sample values: smtp_server – The smtp server used to email reports. (e.g. <smtp_server>smtp.gmail.com:587</smtp_server>)
smtp_enable_ssl - Set to ‘true’ to enable SSL.(e.g. <smtp_enable_ssl>true</smtp_enable_ssl>)
smtp_user_id - The user id that is used to login into the smtp server. (e.g. <smtp_user_id>reports@myorg.com</smtp_user_id>)
smtp_password - The password id that is used to login into the smtp server. (e.g. <smtp_password>mypasswordl</smtp_password>)
smtp_from - The ‘From’ email address used in the report emails. (e.g. <smtp_from>reports@myorg.com</smtp_from>)
smtp_from_name - The ‘From’ name used in the report emails. (e.g. <smtp_from_name>MyOrgReports</smtp_from_name>)
error_report_to - The email address to send error reports to. (e.g. <error_report_to>admin@myorg.com</error_report_to>)
channel_type - tcp or http – must match the setting of the Remote Host in the Scheduler Settings of the Administration Console. (e.g. <channel_type>tcp</channel_type>)
port - The port number of GINESYS Report will use to trigger Ginesys Report Scheduler jobs, default is 2001. This should also be entered in the Scheduler Settings of the Administration Console. (e.g. <port>2001</port>)
| Warning |
|---|
AlertNote: smtp_enable_ssl and port must have the values shown in their examples. |
| Info |
|---|
IMPORTANTNOTE: Settings that can be true or false are case sensitive and should use lower case. Please Save all changes before following next step.
|
|
|

