How To: Install POS Application Server (Old setup 1.30.4)
This article describes how to install POS Application Server using setup 1.30.4.
The support on the POS setup 1.30.4 has been withdrawn. Users are requested to use current setup of version 1.146.2 and follow the current instillation guide - /wiki/spaces/~5570584eb70e2b10514081a4b0925399f77519/pages/1378418758
Pre-requisites
- GINESYS POS 1.30.4 Installation DVD must be present.
- Microsoft .NET framework 4.6.2 must be installed in the system.
- Compatible versions of Windows OS must be installed in the system.
- Crystal Reports Runtime 13.0.20 must be installed in the system.
- SQL Server must be installed.
- The Site Key must be provided by the HO.
- The Machine Name must be known.
- The WebDB.cfg file must be provided by HO. It must be downloaded in the system and it's location noted.
Step-by-step guide
The steps are as follows:
- Play the GINESYS POS Installation DVD in your machine and open the folder. It should have the following:
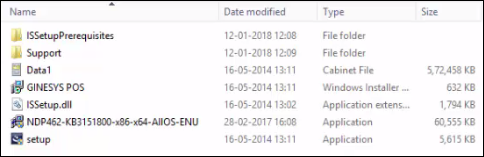
- Right-click on the Setup option and select the Run as Administrator option from the drop-down. This will open User Account Control window. Click Yes. Ginesys POS - InstallSheild Wizard window opens.
- Once the files are loaded, the welcome screen appears. Click Next.
- In the Customer Information page, put your company's name in the Company Name field. Click Next.
- In the Choose Destination Location page, choose your destination location in the using the Browse button. Otherwise, note the Destination Folder location for future reference and click Next.
- Next comes the Ready to Install the Progress page. Click Install.
- Before the installation process is completed, a window appears (also called Ginesys POS - InstallSheild Wizard) displaying the list of tasks that will be installed after the installation process is complete. Cick OK.
- InstallSheild Wizard Complete page is displayed. Click Finish. The POS icon will be displayed on your desktop.
- Now you need to create an SQL Database for the POS. To do so, right click on the POS Icon and select the Open File Location option from the drop-down.
Once the file location is opened group the files by their group.
Right click on any empty space on the right hand side of the screen, go to Group by in the drop-down. Next go to Type in the sub menu.
- Go to the Application group and look for Database Locator. Right click on it and select the Run as Administrator option from the drop-down. This will open User Account Control window. Click Yes. It opens the Local Database Locator.
- In the Database field, select
 Create a new database option.
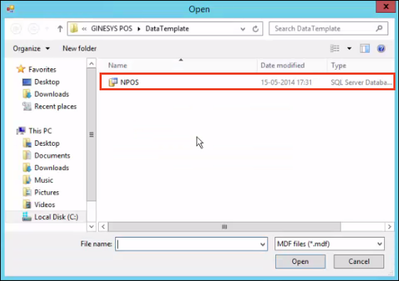
 - Click on the Browse button beside the MDF FIle Location field. This opens the Open window. Select the SQL Server Database. In this case, NPOS.
- Click OK.
- Click on Create database option.
- NPOS Database created successfully. If you would like to connect to this database now, click 'Yes'. To configure your connection manually click 'No'. - message will be displayed. Click OK.
- Click Close to close the Local Database Locator.
Now go to the POS icon and open it. Ginesys POS Application Setup window opens.
Also known as Ginesys POS 1-2-3 setup process
- Provide the Site key (to be provided from HO).
Click on the Locate button beside Configuration file field. Look for the downloaded config file (using the location noted earlier), select it and click Open.
Check the connection using the Test Connection button.
Web database connection successful. - message will be displayed, if you have a successful connection. Click OK.- Provide some random License key number.
- Next go to Step 1. Click on the Create Store Record button.
- Once completed, go to Step 2 and click on the Activate License button.
- Lastly, go to Step 3 and click on the Synchronize.
- The POS Login window opens. Click on License manager option. GINESYS POS - License Manager opens.
- Go to the Settings tab.
In License Service Configurations section, provide the Machine Name and Port.
Port: 9000
- Once done, click OK.
- Configurations saved successfully. - message will be displayed. Click OK.
- Click Close to close the GINESYS POS - License Manager window.
Login using 'system' as User Name and Password. Create users for future use.
You do not need to create users, if the site is HO controlled.
- Now you must set the POS terminal.
To know how to set up a POS Terminal, click on the link: /wiki/spaces/~5570584eb70e2b10514081a4b0925399f77519/pages/26116154
Related articles