We’re excited to announce that the latest information is now available on our new site, the Ginesys One Wiki!. Visit the site for up-to-date resources and insights. We look forward to continuing to support you there!
We’re excited to announce that the latest information is now available on our new site, the Ginesys One Wiki!. Visit the site for up-to-date resources and insights. We look forward to continuing to support you there!
Adding, Editing, Deleting & Printing GRC (Goods Receive Challan)
- Deepankana Roy (Unlicensed)
- Aparajita Basu Roy
- Subhasree Banerjee (Unlicensed)
- Debrupa Datta (Unlicensed)
A GRC (Goods Received Challan) is a record used for confirming that delivered goods have been received and often compared to a Purchase Order before payment through Invoicing is issued. It is a verification note filled up by the customer at his end. GRC affects the Inventory but has no impact in the Finance.
This article describes how to manage GRC in Ginesys HO.
Important information - All types of GRC is done in same form
Note: In the new version, GRC-Adhoc and GRC Against Order are created in the same form. You can get Mixed GRC in the list view of GRC module.
Prerequisites
- The users' role must have access to the Add app operation in the Receipt feature in Procurement - Operation - Goods In/Out through Roles in Ginesys Web - Admin - Security.
- The document numbering scheme for GRC must be present for the connected site. In case, you wish to automatically create Purchase Invoice from GRC, you need to have the doc scheme for PI too.
The following masters need to be created and updated in Admin, Inventory and Procurement modules:
- Roles - Application operations assigned for GRC module.
- User Profile - User need to select the settings related to GRC in Admin > Security > User Profile > Procurement Tab. New setting options related to GRC are given below :
Allow selection of items from Order mode in Receipts
Goods Receipt Against Order
New column - ‘Batch/Serial' - has been added in the Order Mode in Item Information grid
Item row having Batch/Serial information will display ‘Detail’ with hyperlink, in Batch/Serial column.
Clicking on the record (having some value), Inbound Batch/Serial window will open in edit mode with below mentioned columns.
Batch/Serial No., Mfg. Date, Valid Upto, WSP, RSP, MRP, Standard Rate, Receive Qty., Order No., Order Date ,Rate
Note: Window will open for selection of Batch & Serial as provided in GRC inward.
Edit option is available.
For auto created batch/serial, display batch/serial number and no editing or change is allowed.
Goods Receipt (Adhoc) - Batch/Serial wise Data Flow
New addition in UI highlighted in red
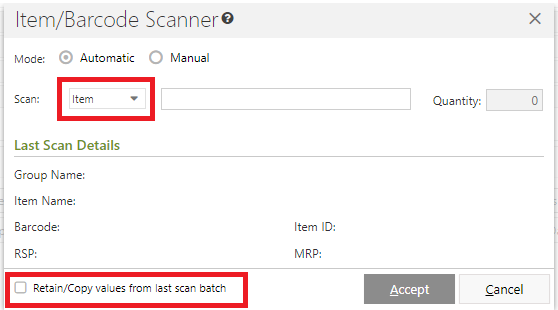
A new LOV has been added just before Item scan field the values displayed for choosing : Item and Batch/Serial.
If Item scanning is selected then batch details is automatically added to scanned item barcode.
If Batch/Serial is selected then the batch/serial can be scanned inNew option for retaining batch/serial value has been added with a checkbox at footer of scan window - ‘Retain/copy values from last scan batch’
Scanning Details
Item Scanning : Item Barcode and Item concatenated.
Batch/Serial scanning is allowed
Behaviour on scanning: Scanningbehaviour
Last Scan Details
BehaviourFor normal item scan where there is no batch/serial implication, follow existing flow (no change)
For batch/serial managed item show below mentioned info in last scan details
Batch/Serial No. (New)
Valid Upto (New)
Group Name (Existing)
Item name (Existing)
Barcode (Existing)
Item id (Existing)
RSP (If pricing is managed at <> item level then batch/serial’s RSP)
MRP (If pricing is managed at <> item level then batch/serial’s MRP)
Note: This information would be shown only when single item/batch or item/serial combination is scanned/selected. Where multi item/batch or item/serial combination is scanned/selected, do not show last scan details, keep it blank.
- Allow Adhoc item selection in Receipts
- Display Purchase rate and value for Receipts
- Allow item price population from GRC
- User - Role, Profile Policy and Sites to be assigned for GRC
- Document Numbering Scheme - Scheme needs to be created and tagged with GRC module in Web.
- Organization Sites - Document numbering schemes tagged with GRC module need to be allowed.
- Inventory Month - Respective Inventory Months for entry date should remain Open.
- For 'On the Fly' item creation; Allow creation of new item / barcode from transaction entry in Inventory tab has to be enabled in User Profile.
- Roles - Application operations assigned for GRC module.
- Organization Unit for which the Goods Receive is to be created must be connected through a site and the connected site must be either organization site or any managed site.
- Store setup must be completed and store operations started before GRC (local procurement) is created.
Step-by-step guide
The steps are as follows:
- Go to Ginesys Web > Procurement > Operation > Goods In/Out > Receipt.
- Goods Receive Challan module will open.
- All the previously created GRCs will be listed here.
- Click on Add button.
- Goods Receive Challan window will open.
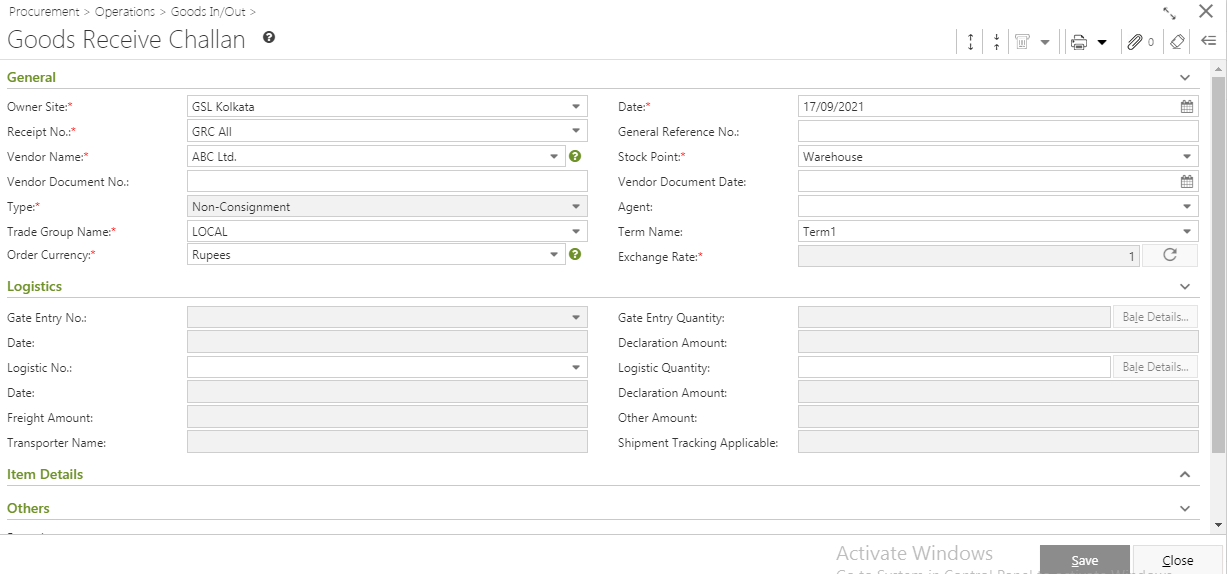
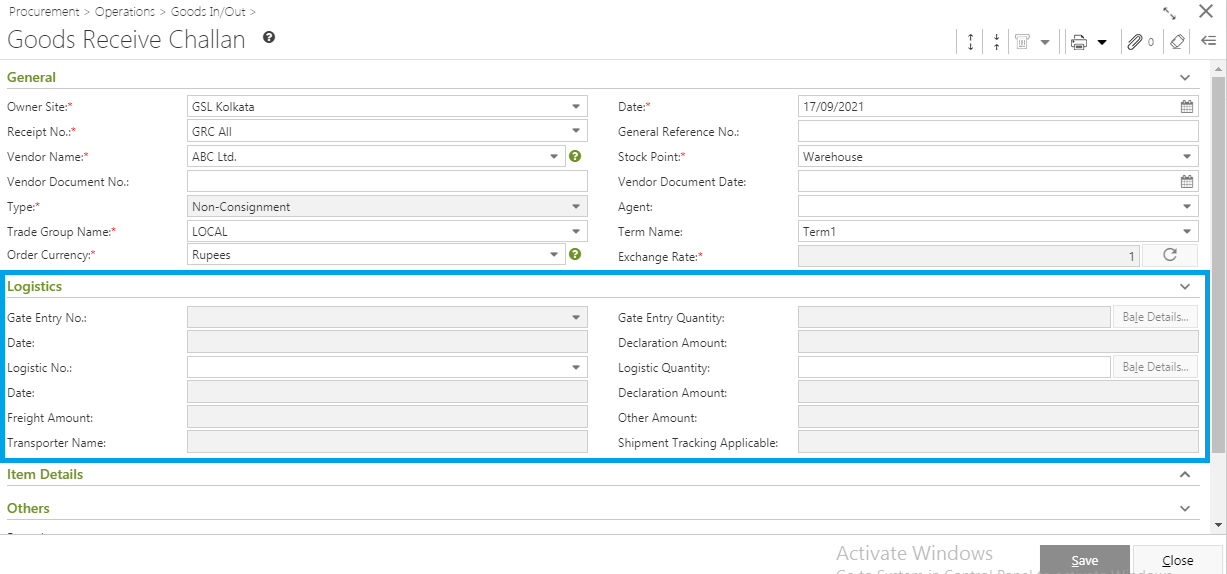
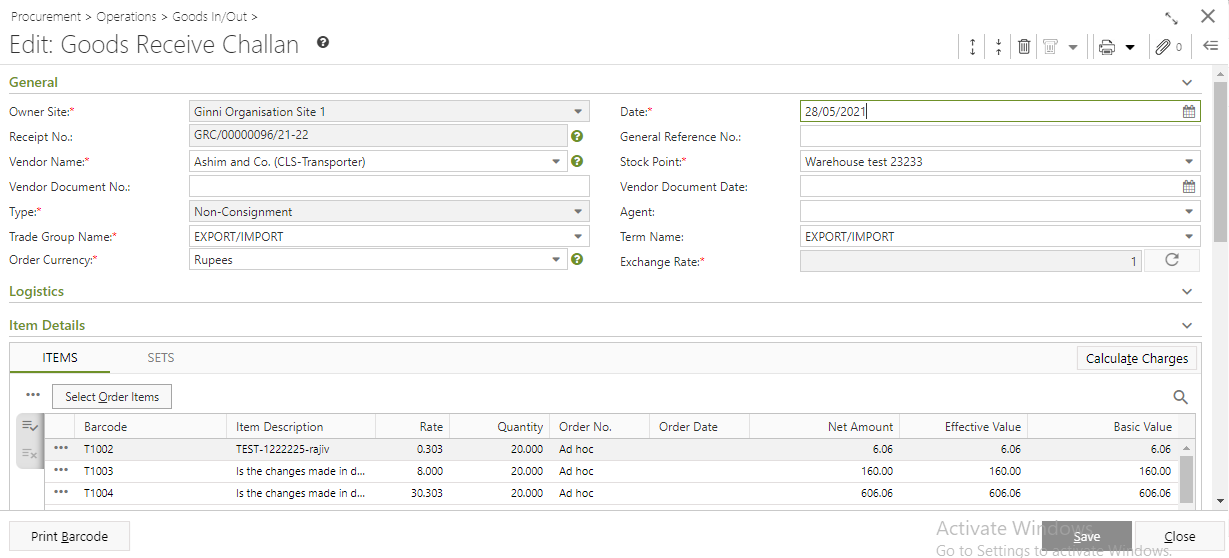
- You will get four sections - General, Logistic, Item Details and Others.
- General:
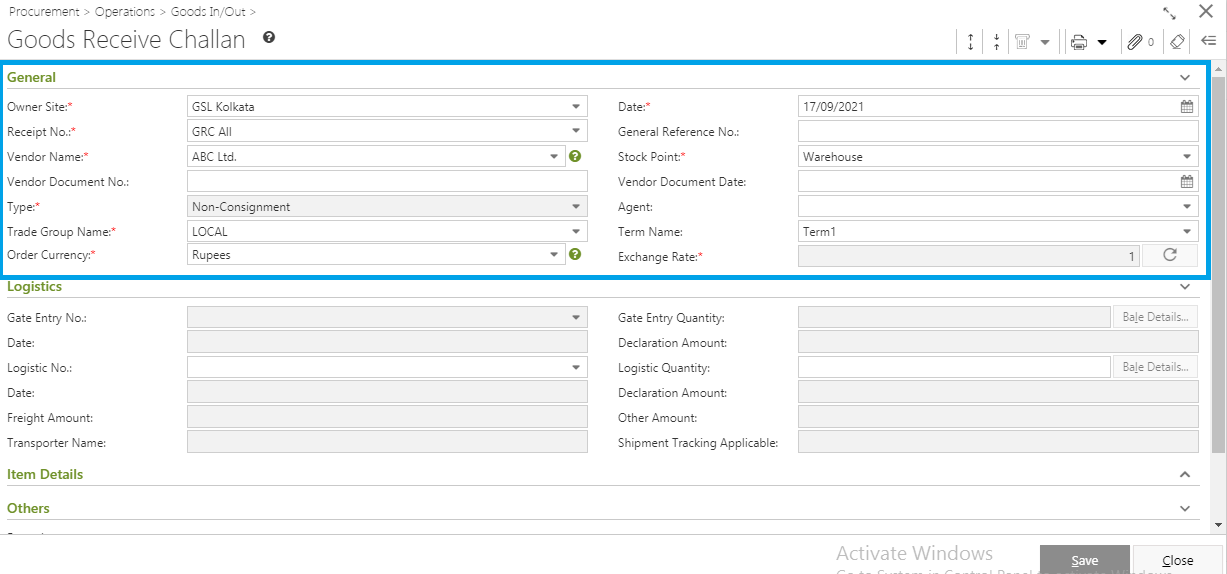
- Select the Owner Site (Mandatory Field) for which you want to create the GRC.
- Select a Document Numbering Scheme, already created in the master, from the field Receipt No.
- Select the Vendor Name from the drop down list.
Some of the details of the selected vendor will be populated automatically:
Type (Consignment or Non-Consignment), Trade Group Name, Term Name, Order Currency (if there are pending orders for the selected vendor), Exchange Rate (if Order Currency is available).Note:
Type, Order Currency, Date, Stock Point and Exchange Rate are mandatory fields.
You can change the Type of the vendor from Consignment to Non-Consignment and vise versa if the checkbox Allow Consignment Purchase is selected in the Procurement tab of Vendor Master.
You can modify others details - Trade Group Name, Order Currency, Date etc Exchange Rate.
Modification of Exchange Rate will recalculate the rate of the order items only and a confirmatory alert message will be shown - "Modification of the Exchange Rate will recalculate Rates of items selected against an order only. Please confirm the changes." . If you click on the Proceed button, the Rate of the selected items will be multiplied as per the new Exchange Rate. Modification of Exchange Rate does not affect Adhoc items.
- Select the Owner Site (Mandatory Field) for which you want to create the GRC.
- Logistic: If the logistic is applicable for the selected vendor, Logistic section will be enabled. Before item selection, you need to select the values in the mandatory fields.
Item Details: You will get two tabs in Items Details section - Items and Sets. All methods of item selection available in Receipts, except Select Order Item, can be used for selecting adhoc items in GRC.
Items: You need to add items in the GRC by using Search Item, Create Item, Import Barcode, Select Order Item, Select Alternate Mode etc.
Alternate Mode
New columns have been added in the Matching Receive Items Grid:
Three new columns to be added in the grid - Batch/Serial No. | Mfg. Date | Valid Upto
All column types to are “View only”, i.e. modification is not allowed.
Position: Column has been added after Item description .
It is hidden by default and displayed in column list for selection.
Behaviour:
It has been populated from various item selection modes.
Modification is not allowed, once the row is populated in main item grid
Use case: if user wants to change the batch number, he needs to delete the row and re-addDisplayed data has been made hyperlink
Clicking on the record(having value), popup window will displayed.
Batch/Serial Detail window on item scan will open in display mode.
Window will display details of Batch/Serial information for the respective batch
Item population modes
Create Item - Adhoc GRC Create Item
Select Item - Adhoc GRC select item
Scan Item - Adhoc GRC scan item
Import barcode - Adhoc GRC import barcode
Import excel - Adhoc GRC import excel
Behaviour on Populate
Receive qty for serial managed item should be equal to scan unit of an item
Group the rows as per the grouping logic and populate the same in the main item grid after all validations
SELECT SET (CTRL+ALT+R)
On clicking Populate:
For items with Inventory Management = Item wise, Quantity to be populated as per existing behavior.
If at least one Batch Managed or Serial Managed Item found,
Open a window - Select Batch/Serial.
For behaviour follow: Inbound | Batch & Serial Detail Window
Note: If any of the Items removed from the Select Batch window, entire Set Items have to remove, i.e. partial population of set items are not allowed.
Set Mode Item grid:
New columns have been added in the expanded Item Grid within Select Set window - Batch No., Serial No., Manufacturing Date, and 'Valid Upto'.
All these columns are un-editable.
Values are displayed as selected in the Select Batch & Serial window.
If Logistics data is provided and Order Items are selected, then
a. Orders delivered by the selected transporter will be displayed.
b. Orders which are not tagged to any transporter is selected will also be displayed.Note: If a duplicate Adhoc Item is entered through any item selection mode except for scan, a confirmation window named Duplicate Item opens.There will be three options in Operation - Append, Overwrite and Discard.
- If you select Append, the quantity of the existing item would be Increased.
- If you select Overwrite, the previous quantity will be Removed and the new quantity will be displayed.
- If you select Discard, there will be no change in the previous quantity.
If you enter duplicate item through scan item mode, the quantity of the existing item will be increased.
Item selection method for GRC Adhoc
All methods of item selection available in Receipts, except Select Order Item, can be used for selecting Adhoc items in GRC.
- Create Item: If you create new item(s) from this section, it will be saved in the Item Master as a new item.
Search Item: This process will search the items from the Item Master according to the search criteria.
Search criteria (existing behavior as-is)
POPULATE’ BEHAVIOUR
Clicking populate to open inbound Batch/Serial creation/selection window - Inbound | Batch & Serial Detail Window
For items with batch/serial details, will populate items directly to the main grid with all the batch/serial information.
Item grouping logic
Barcode wise - Batch No. Wise - Order No. wise - Rate wise.
Scanning of item
Behaviour of this section would be similar to Scan item → Automatic mode: Scanningbehaviour
If CONCAT is scanned and is valid then no popup will open and directly it will get tagged in the grid with the Order item row
If SERIAL/BATCH/SET is scanned then throw an error as invalid barcode.
If only ICODE/BARCODE is scanned then, open batch/serial inbound creation window depending on the item inventory management.
On Set Scan : Multi item Batch/Serial window to open for on scanning item set. Follow: Inbound | Batch & Serial Detail Window.
Scanning Barcode- Scan Item will allow both Icode & icode concat, in case of concat system will only consider value before the separator.
Scan Item: You can directly Scan the Barcode to add items.
Import Barcode: The Import Barcode feature allows to populate items using the .csv or .txtfiles.
Import Barcode
Follow Import Barcode
No batch/serial creation would take place from import barcode.
If batch/serial exists then user can input and it will get tagged against the item row.
Import Set barcode (existing behavior as-is)
No batch/serial details required in case of import set barcode.
‘POPULATE’ BEHAVIOUR
For Batch/Serial applicable items, Match batch/serial information as against receive qty. and information in 'Detail' of Batch/Serial.
Receive qty. matches with batch/serial information in ‘details’ window of batch/serial column, populate directly to the main grid with all the batch information
For each line item against which batch/serial detail qty does not match with receive qty.
Open a batch/serial window for creation/selection with differential qty (Qty can not be modified)
Import Excel: Items can be populated in the GRC using the Import Excel feature of Ginesys.
Item Grid
New columns have been added in the Item Detail grid:
Three new columns have been added in the grid - Batch/Serial No. | Mfg. Date | Valid Upto
All column types are “View only”, i.e. modification is not allowed.
Position: Column has been added after Item description .
It is hidden by default and displayed in column list for selection.
Behaviour:
It has been populated from various item selection modes.
Modification is not allowed, once the row is populated in main item grid
Use case: if user wants to change the batch number, he needs to delete the row and re-addDisplayed data to has been made hyperlink
Clicking on the record(having value), popup window will be displayed.
Batch/Serial Detail window on item scan will be opened in display mode.
Window will display details of Batch/Serial information for the respective batch
Note: Quantity won’t be editable for rows in which “Order no.” is not NULL.
Concept: Where the parent doc is tagged with the inward/outward transaction and parent doc does not have batch/serial, then in main item grid validation of pending qty will create a problem, so in such case we will not allow modification of such rows. In case user wants to edit, then delete and re add the rows.
From version 11.147.3x- Users can select to update items from transactions through import Excel optionNote: You can create a single receipt(GRC) against multiple Purchase Order.
Item Combination: Item Combination is used to create multiple items with different combination of category values, it basically saves time and effort while creating PO for similar items in the same department.
Item Combination Application
If a purchaser wishes to place an order for an item from same department with 5 different sizes and 6 colours then he can just select Department and provided the different category values and thirty items are displayed in the main PO form where the user can put in the required order quantities. He doesn't need to manually enter thirty items.
Copy Challan: Only item details of existing challans can be copied and the items included to create new challans.
Note: The given conditions are followed to display the list of Challans to be copied:
- Only receipt made in the current financial year will be displayed.
- Only receipt made from the connected OU name will be displayed.
- Only receipt made from the connected site will be displayed.
- Challan number once selected in a particular GRC will not be displayed in the list for further selection.
- Only challans which are not made extinct will be displayed.
- Only receipt made in the current financial year will be displayed.
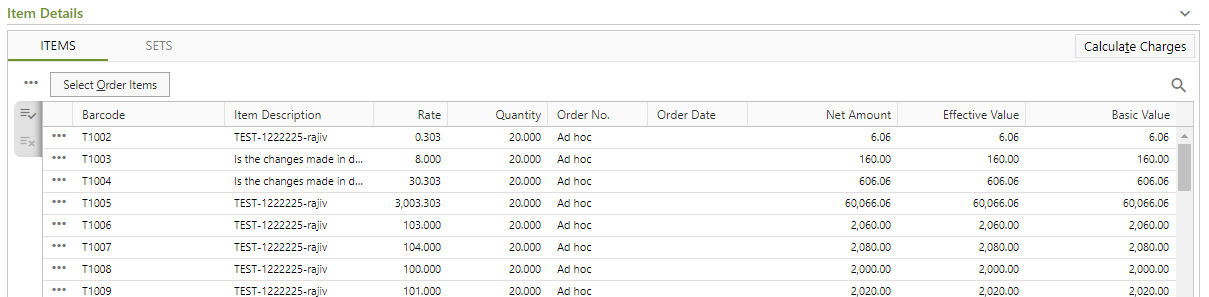
Selected items details will be populated with Barcode, Item Description, Rate, Order No., Order Date etc.
Note: If you select items through Purchase Order, the Order Date and Item Description will be populated from Purchase Order. Otherwise the Order Date will be blank in case of Adhoc item selection.
Allow rate change in Purchase Order, then user can change the Rate of the items from the list.
All the selected items or set will be populated with Item Barcode, Item Description, Rate, Quantity, Item Remarks etc.
Note: Item Level Remark will be populated from Purchase Order for order item. It can be entered manually for Adhoc items and ordered items also if the remark is not present in the Purchase Order. Manually entered Item Remark will not include in Purchase Order.
- Total No. of Item, Total No. of Qty and Basic Value will be calculated and populated.
- If you click on the
 button left side of the populated item, you will get a drop down list.
 - Delete Record: You can delete the populated item from the list as per your requirement.
- Price Population: You can alter the price of an item from a particular date and for a particular site.
- Item Charge: The charges applied on the particular item will be displayed by clicking on this option. However, you may change the factors of the charges applied based on the settings in your user profile.
- View Properties: You can check the item details by clicking on this option. It will open the Item Master window but you cannot edit any details.
- Edit Item: you can edit the selected items. By clicking on Edit Item, Item Master will open. The edited item will be saved in the Item Master directly.
- Now you need to calculate Charge. Click on the Calculate Charge button. But even if you skip this step, charges applied will be automatically calculated on saving the form.
Charge will be calculated and the final amount after charge application will be populated as Net Amount.
If you click on any applicable charge, Applicable Item window will open. You can alter the charge factor if you have enabled the proper user profile setting.
The applicable charge amount or discount amount will be divided between all the items.
Note: If you want to calculate the charge of Adhoc items, you need to select Term Name in the General section. Otherwise you will get a message - "Term selection is required to calculate charges of items without Order. Please select Term to calculate charges."
It is not mandatory to select a Term for items of Purchase Order. The charge will be calculated as per the Term selected in the Purchase Order.
If you save the GRC without charge calculation, you will get an alert message - "Charge is not calculated yet. On saving this entry, Charge will be automatically calculated based on selected Term. Please confirm to proceed."
- Others:
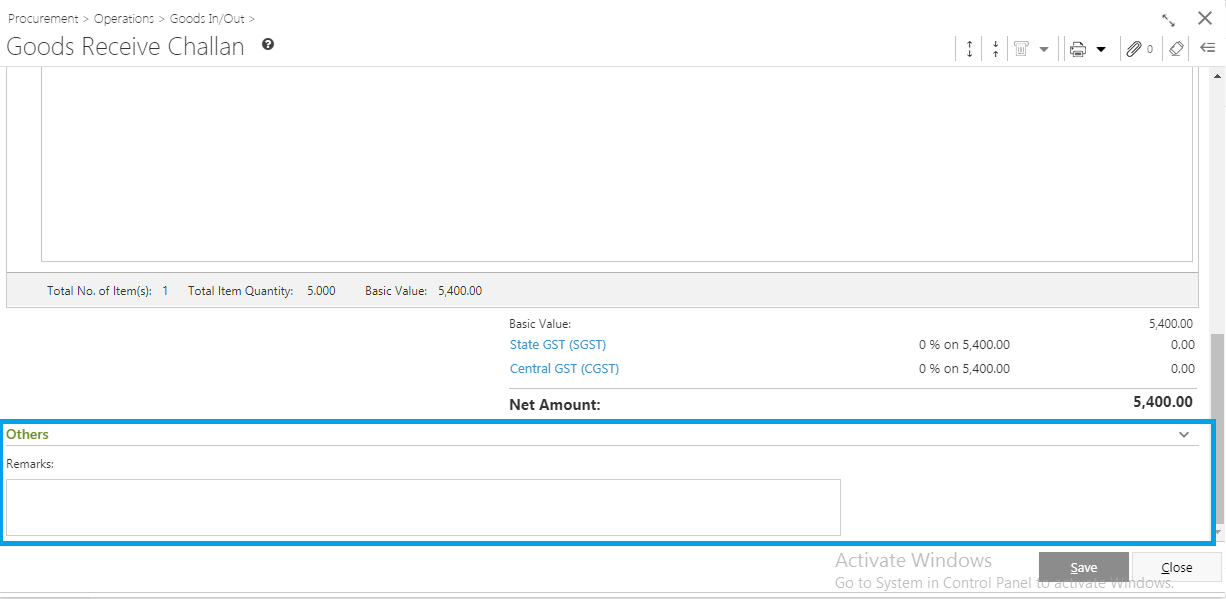
- You can put in the remarks in the Remarks field.
- You can put in the remarks in the Remarks field.
Click on the Save button to save the Goods Receive Challan.
If the Margin Rule is violated for the selected items, the Invalid Margin Rule Items window will open at the time of saving the GRC. You will get a Red Marked Rate or WSP or RSP amount for which the rule is violated. You need to change the Value of the Red Marked amount as per the rule mentioned in the Rule Name column. Click on the Populate Corrected Value button. The new value will be populated.
You will get a Proposed Value by the system if the profit amount is Greater Than Zero (>0) for the present given Rate or WSP or RSP. Otherwise the Proposed value will be Zero(0). If you want to proceed with the Proposed Value, you can directly accept it by clicking on the Fill with Proposal Rate/RSP/WSP button.
You can ignore the Margin Rule Violation by clicking on the Ignore and Save button, it will be enabled only if proper setting in the user profile is selected.
- You will get a message - "Document <GRC No.> saved successfully."
- Click on OK.
- You will get a message that system will ask you - "Do you want to generate Purchase Invoice against this Receipt?" if the GRC is making for Non-Consignment, Outright mode and auto PI generation is allowed then only auto PI generation is possible. Otherwise, a new GRC with provided details will be created.
- If you click on Yes, Purchase Invoice window will open populating Vendor Name, Reference Site, Vendor Ledger, Trade Group. System Date will be populated in the Invoice Date.
- You need to put in the Document No., Document Date (must be system date or greater than the system date) and the Purchase Ledger.
- Click on the Generate button.
- You will get a message - "Invoice No. <PI No.> successfully generated."
Prerequisites
- The users' role must have access to the Edit app operation in the Receipt feature in Procurement - Operation - Goods In/Out through Roles in Ginesys Web - Admin - Security.
Goods Receive Challan must be created and neither Released nor invoiced.
Step-by-step guide
The steps are as follows:
- Go to Ginesys Web > Procurement > Operation > Goods In / Out > Receipt.
- Goods Receive Challan Module will open.
- List of already created GRC will appear.
Select the one GRC you want to edit.
You can use Filter to search particular GRC(s). You will get a default filter that searches the GRC created in last 7 days. You can remove or alter this filter.
Note: If you select multiple GRC, you will get the Edit option disabled. You cannot edit multiple GRC at a time.
- Go to Action > Edit.
- Edit Goods Receive Challan window will open.
- All the details will be populated.
- Modification of vendor details in GRC-Adhoc:
- When you will try to change Vendor Name, You will get a alert message - "Modification of Vendor name will reset GRC Type, Stock point, Trade Group, Term, Agent, Logistics applicability and Rate of all items, as per setting of new vendor selected. Please confirm."
- Either click on OK if you want to proceed or click on Cancel if you do not want to edit Vendor.
- If the Item Charge is not calculated previously, after clicking on the OK button you will get a message - "Tax Region is not defined for Vendor. Item level tax charge would not be calculated. Do you want to proceed?"
- If you click on Yes, the charge will be calculated and the newly selected Vendor Name and all the related details will be populated.
- When you will try to change Vendor Name, You will get a alert message - "Modification of Vendor name will reset GRC Type, Stock point, Trade Group, Term, Agent, Logistics applicability and Rate of all items, as per setting of new vendor selected. Please confirm."
- Modification of vendor details GRC Against Order:
- When you will try to change Vendor Name, an alert message appears - "Some of the item(s), set(s) selected are against Purchase Orders of the existing Vendor. Kindly remove such items to modify vendor name."
- If you want to change the Vendor Name, at first you need to delete the items or set against Purchase Order.
- When you will try to change Vendor Name, an alert message appears - "Some of the item(s), set(s) selected are against Purchase Orders of the existing Vendor. Kindly remove such items to modify vendor name."
- You can Add new Item and Item Set in the GRC.
- You can Delete Items from GRC in Edit Mode.
- Click on the Save button to save the modified GRC.
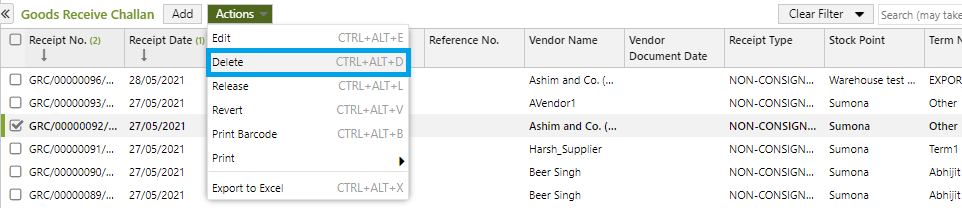
Note: GRC can be deleted in the Edit mode. You will get the Delete Icon at the top right corner of the window (4th icon from the right) .
.
Prerequisites
- The users' role must have access to the Delete app operation in the Receipt feature in Procurement - Operation - Goods In/Out through Roles in Ginesys Web - Admin - Security.
Goods Receive Challan must be created and not Released.
Step-by-step guide
The steps are as follows:
- Go to Ginesys Web > Procurement > Operation > Goods In / Out > Receipt.
- Goods Receive Challan Module will open.
- List of already created GRC will appear.
Select the one or more than one GRC you want to delete.
- Go to Acton > Delete.
- You will get a message - "Document once deleted cannot be retrieved. Do you want to delete this document?"
- If you click on Yes, you will get a confirmation message "<GRC No:> - Successfully deleted"
Prerequisites
- The users' role must have access to the Release app operation in the Receipt feature in Procurement - Operation - Goods In/Out through Roles in Ginesys Web - Admin - Security.
Goods Receive Challan must be created and not Released.
Step-by-step guide
The steps are as follows:
- Go to Ginesys Web > Procurement > Operation > Goods In / Out > Receipt.
- Goods Receive Challan Module will open.
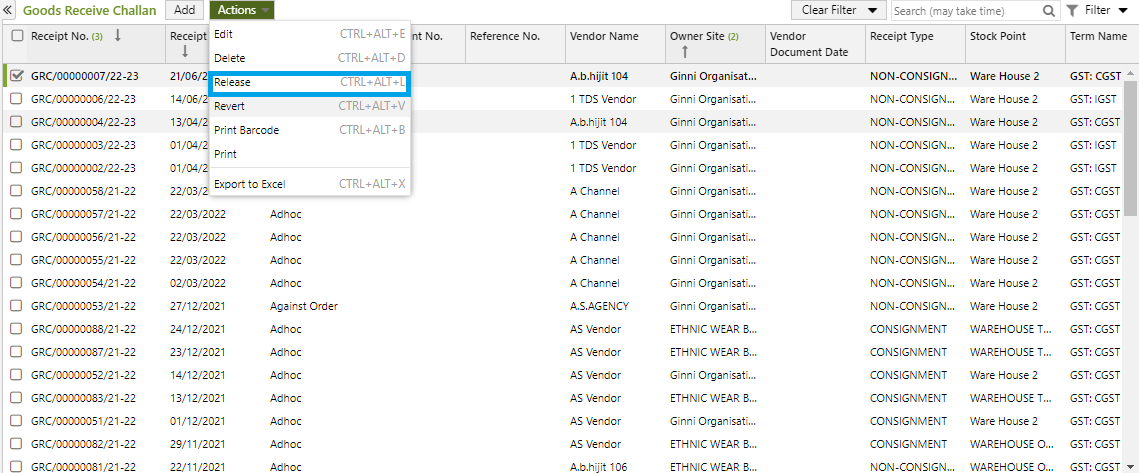
- List of already created GRC will appear.
Select the one or more than one GRC you want to release.
- Go to Action > Release.
You will get a message - "Document(s) once released cannot be modified. Do you want to proceed?".
Behavior of Release operation depending on site type
Note:
- GRC for Organization Sites are auto-released. In case a user tries to Release a GRC for Organization site, the following message is seen -
Receipt No. <GRC No.> : Release operation is not applicable to <Name of Organization Site>
- GRC for Managed Sites have to be released.
- GRC for Organization Sites are auto-released. In case a user tries to Release a GRC for Organization site, the following message is seen -
If you click on Yes, the GRC will be released.
Prerequisites
- The users' role must have access to the Revert app operation in the Receipt feature in Procurement - Operation - Goods In/Out through Roles in Ginesys Web - Admin - Security.
Goods Receive Challan must be created and Released.
Step-by-step guide
The steps are as follows:
- Go to Ginesys Web > Procurement > Operation > Goods In / Out > Receipt.
- Goods Receive Challan Module will open.
- List of already created GRC will appear.
Select the one or more than one GRC you want to revert.
- Go to Action > Revert.
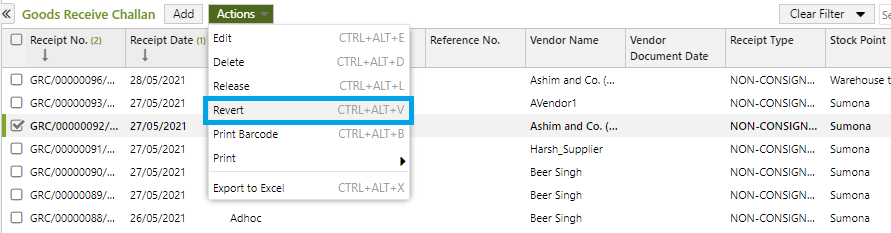
You will get an alert message "Selected documents will not be un-posted, and stock postings done at store will also be reverted. Do you want to proceed?"
Behavior of Revert operation depending on site type
Note:
- GRC for Organization Sites are auto-reverted. In case a user tries to Revert a GRC for Organization site, the following message is seen -
Receipt No. <GRC No.> : Revert operation is not applicable to <Name of Organization Site>
- GRC for Managed Sites have to be reverted.
- If you click on Yes, the GRC will be reverted.
- You will get a message - "Receipt No: <GRC No.> Reverted Successfully."
Prerequisites
- The users' role must have access to the Print Barcode app operation in the Receipt feature in Procurement - Operation - Goods In/Out through Roles in Ginesys Web - Admin - Security.
- Printer must be connected to the device.
Step-by-step guide
The steps are as follows:
- Go to Ginesys Web > Procurement > Operation > Goods In / Out > Receipt.
- Goods Receive Challan Module will open.
- List of already created GRC will appear.
Select the one or more than one GRC you want to print.
- Go to Action > Print Barcode.
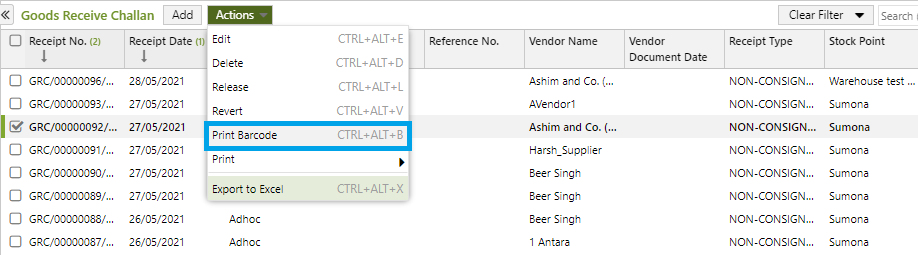
- Print Barcode window will open.
- Select Printer from the drop down list.
- Select the Type of the Printer.
- Put in the Config Name.
- Select the Print Quantity.
- Click on the Print button.
- The Barcode of the selected GRC items will be printed in the selected printer.
Last receipt date of an item will be available from version 12.4.4 onwards.
Prerequisites
- The users' role must have access to the Print app operation in the Receipt feature in Procurement - Operation - Goods In/Out through Roles in Ginesys Web - Admin - Security.
- Printer must be connected to the device.
Step-by-step guide
The steps are as follows:
- Go to Ginesys Web > Procurement > Operation > Goods In / Out > Receipt.
- Goods Receive Challan Module will open.
- List of already created GRC will appear.
Select the one or more than one GRC you want to print.
- Go to Action > Print.
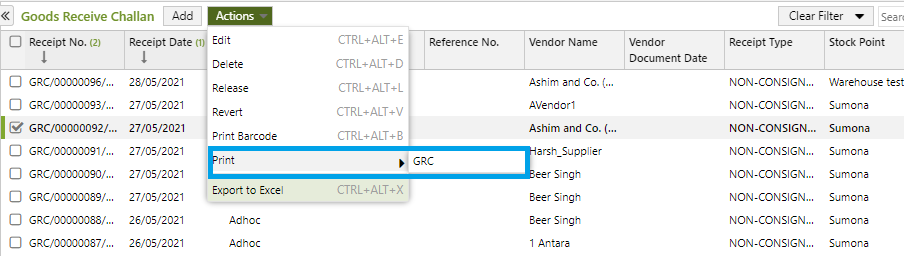
- The GRC will be printed.