We’re excited to announce that the latest information is now available on our new site, the Ginesys One Wiki!. Visit the site for up-to-date resources and insights. We look forward to continuing to support you there!
We’re excited to announce that the latest information is now available on our new site, the Ginesys One Wiki!. Visit the site for up-to-date resources and insights. We look forward to continuing to support you there!
Adding, Editing, Deleting & Printing PI (Purchase Invoice) in Ginesys Web
- Deepankana Roy (Unlicensed)
- Subhasree Banerjee (Unlicensed)
- Debrupa Datta (Unlicensed)
- Aparajita Basu Roy
What is Purchase Invoice?
PI (Purchase Invoice) is raised by the Purchaser after he receives the purchased goods from the Supplier. The Invoice bears all the details of the transaction with the total amount owed to the Supplier. If a Purchase Invoice is not created, then the Supplier account will not reflect the purchase amount in its ledger. Purchase invoice is issued by the purchaser to the seller for confirming the receipt of the order.
What is the purpose of this form?
The current module outlines the general Purchase Invoice. For making an Invoice for Consignment purchase you have to raise it at Consignment Invoice module. Under this module you can only make Invoices for Non-Consignment purchase.
Purchase Invoice and Consignment Invoice are merged in the Ginesys web module. This article describes the process of manage Purchase Invoice in Ginesys web.
Prerequisites
- The users' role must have access to the Add app operation in the Purchase Invoice feature in Procurement - Operation - Invoicing through Roles in Ginesys Web - Admin - Security.
- Supplier must be created.
- Site must be created.
- The document numbering scheme for Purchase Invoice must be present for the connected site.
The following masters need to be created and updated in Admin, Inventory and Procurement modules:
Step-by-step guide
The steps are as follows:
- Go to Ginesys Web > Procurement > Operation > Invoicing > Purchase Invoice.
- Purchase Invoice window will open.
- Previously created Purchase Invoice will be listed.
- Click on the Add button.
- Purchase Invoice window will open.
- You will get group of icons at the top right corner of the window.

- The icons name from left to right are - Expand All, Collapse All, Print Document Report, Attachments, Clear Form and Open Side Panel.
- Expand All: Clicking on this icon, all the sections will be Expand if they are collapsed.
- Collapse All: Clicking on this icon, all the sections will be Closed if they are expanded.
- Print Document Report: Clicking on the Down Arrow beside this icon, you will get Print Preference option with already created Report File Template. This option is used to print document.
- Attachments: You can Upload some required documents from this option.
- Clear Form: Clicking on this icon, you can Clear all the data already entered.
- Open Side Panel: Clicking on this, you will get the details of the current Purchase Invoice as follows:
- Document Summary: In this section you will get the details of Selected Items, Sale Type, Owner Site, Modified by etc.
- Vendor Details: You will get the Selected Customer Details like Address, Contact Details, Tax Region, Credit Limit, Overdue Amount etc.
- Vendor Statistic: This section describes the Received not Invoiced amount, Outstanding Amount, Last Invoice Date etc.
- Document Summary: In this section you will get the details of Selected Items, Sale Type, Owner Site, Modified by etc.
- Expand All: Clicking on this icon, all the sections will be Expand if they are collapsed.
- The icons name from left to right are - Expand All, Collapse All, Print Document Report, Attachments, Clear Form and Open Side Panel.
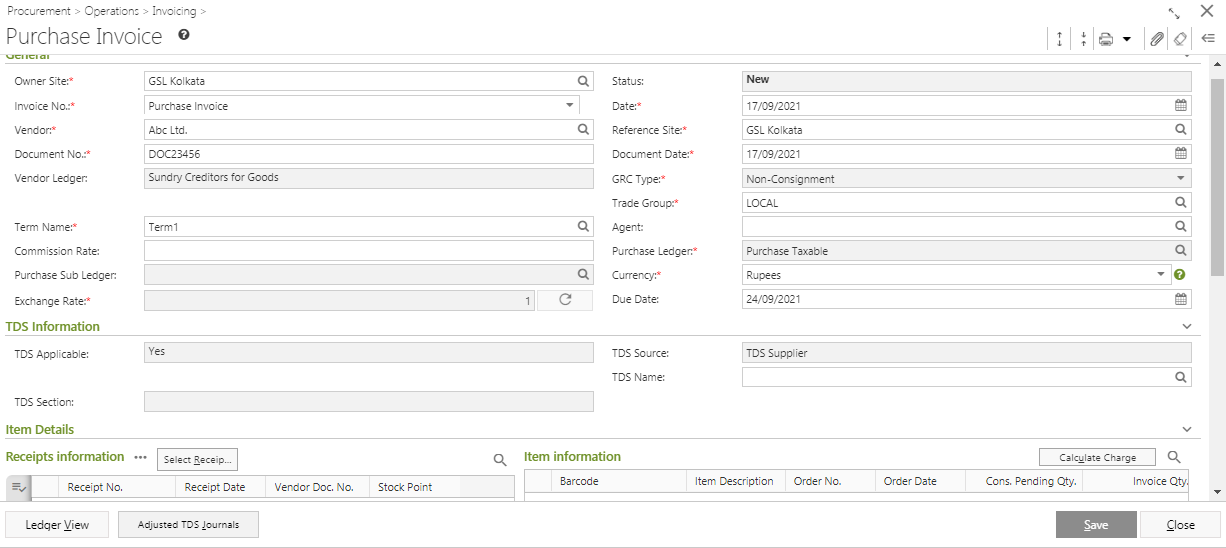
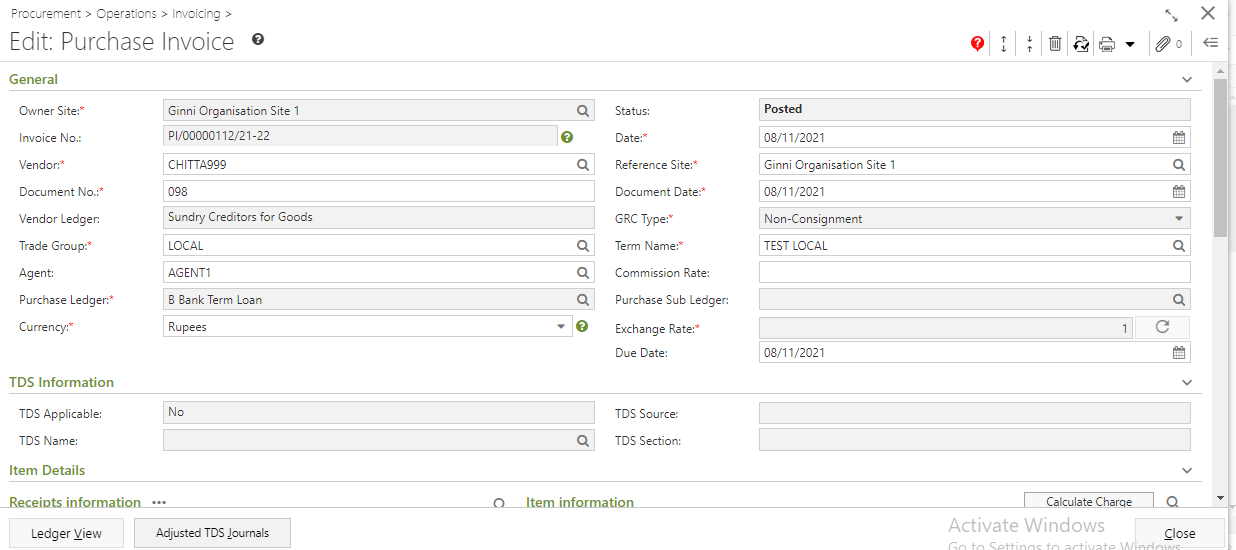
- You will get three section in the Purchase Invoice main form - General, Item Details and Others.
- General:
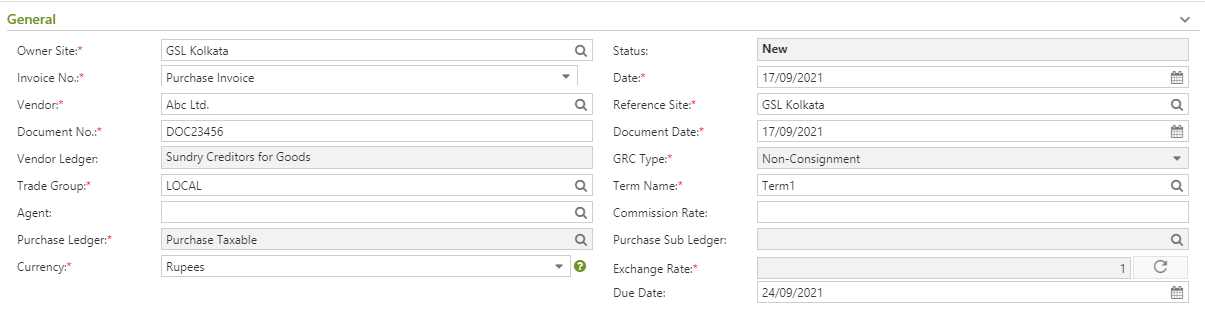
- Select the Owner Site (Mandatory Field) for which you want to create the Purchase Invoice.
- Select a Invoice No. (Mandatory Field) which is already created.
- Select the Vendor (Mandatory Field) from the drop down list.
- According to the selected Vendor, other fields like Reference Site, Trade Group, Term Name, GRC Type, Purchase Ledger, Currency etc will be populated.
- System Date will be populated in the Date field (Mandatory Field).
- Document No., Agent and Document Date are mandatory fields.
- Select the Owner Site (Mandatory Field) for which you want to create the Purchase Invoice.
- TDS Information:

- TDS Information will be updated automatically as per Vendor.
- TDS Information will be updated automatically as per Vendor.
- Item Details:

- You will get two sections in the Item Details - Receipt Information and Item Information.
- Receipt Information:
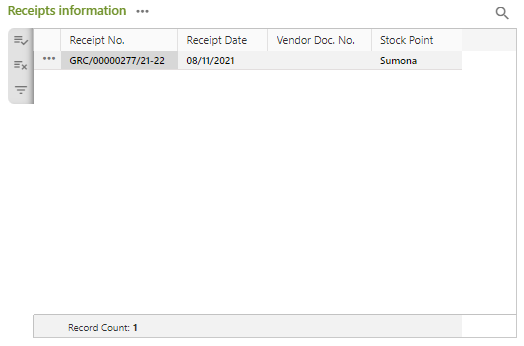
- Click on Select Item Receipt.
Select Receipt window will open.
{page
- You will get the list of GRC in the Receipt Information section.
- Select the GRC against which you want to return.
- The items, present in the selected GRC, will be populated in the Item Information section.
- Click on the OK button.
- The selected GRC will be populated in the Receipt Information section with Receipt Date, Vendor Doc No. and Stock Point.
- If you click on the
 button left side of the populated GRC, you will get a drop down list.
 - You will get Delete Record and Item Charge.
- requirement.
- Item Charge: The charges applied on the particular item will be displayed by clicking on this option. However, you may change the factors of the charges applied based on the settings in your user profile.
- requirement.
- Click on Select Item Receipt.
- Item Information:
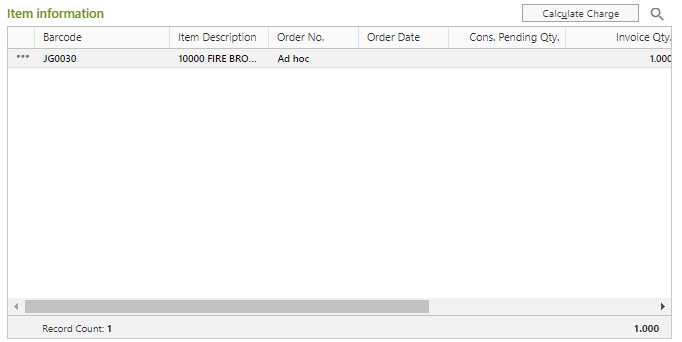
- The items, present in the selected GRC, will be listed in the Item Information section with Barcode, Item Description, Order No. etc.
- You can modify Invoice Qty. and Rate.
- If you click on thebutton left side of the populated item, you will get a drop down list.
- You will get Delete Record, Item Charge and View Properties.
- requirement.
- Item Charge: The charges applied on the particular item will be displayed by clicking on this option. However, you may change the factors of the charges applied based on the settings in your user profile.
- View Properties: You can check the item details by clicking on this option. It will open the Item Master window but you cannot edit any details.
- requirement.
- The items, present in the selected GRC, will be listed in the Item Information section with Barcode, Item Description, Order No. etc.
- Receipt Information:
- You will get two sections in the Item Details - Receipt Information and Item Information.
- Others:

- You can also put in Remarks field in Others section.
- You can also put in Remarks field in Others section.
- Now you need to calculate Charge. Click on the Calculate Charge button. But even if you skip this step, charges applied will be automatically calculated on saving the form.
- Charge will be calculated and the final amount after charge application will be populated as Net Amount.
- If you click on any applicable charge, Applicable Item window will open. You can alter the charge factor if you have enabled the proper user profile setting. The applicable charge amount or discount amount will be divided between all the items.
- Click on the Save button to save Purchase Invoice. You will get a message - "Document <Purchase Debit No:> saved successfully."
Prerequisites
- The users' role must have access to the Edit app operation in the Purchase Invoice feature in Procurement - Operation - Invoicing through Roles in Ginesys Web - Admin - Security.
- Purchase Invoice must be created and Un-Posted.
Step-by-step guide
The steps are as follows:
- Go to Ginesys Web > Procurement > Operation > Invoicing > Purchase Invoice.
- Purchase Invoice window will open.
- Previously created Purchase Invoice will be listed.
- Select the PI you want to edit.
You can use Filter to search particular PI(s).
Note: If you select multiple Purchase Invoice, you will get the Edit option disabled. You cannot edit multiple PI at a time.
- Edit: Purchase Invoice window will open.
- All the details will be populated.
- You will three new icons at the top right corner of the window - Show Message, Delete and Revert.

- Show Message: You will get a message regarding edit of Purchase Invoice.
- Delete: You can Delete the Purchase Invoice from the Edit Mode by clicking on this icon.
- Revert: You can Revert the Purchase Invoice from the Edit Mode by clicking on this icon.
- Show Message: You will get a message regarding edit of Purchase Invoice.
- If you want to modify the Vendor, you need to remove the Receipt. Otherwise you will get a message - "Please remove the receipt(s) before changing the Vendor.". Others details will be changed as per Vendor changed.
- You can modify Agent, Reference Site, Term etc.
- You can also modify and delete Receipt and Items.
- Click on the Save button to save the modified Purchase Invoice.
- You will get a message - "Document <Purchase Debit No:.> saved successfully."
Prerequisites
- The users' role must have access to the Delete app operation in the Purchase Invoice feature in Procurement - Operation - Invoicing through Roles in Ginesys Web - Admin - Security.
- Purchase Invoice must be created and Un-Posted.
- Purchase Invoice must not be Released.
Step-by-step guide
The steps are as follows:
- Go to Ginesys Web > Procurement > Operation > Invoicing > Purchase Invoice.
- Purchase Invoice window will open.
- Previously created Purchase Invoice will be listed.
- Select the PI you want to delete.
- You can use Filter to search particular PI(s).
- Go to Acton > Delete.
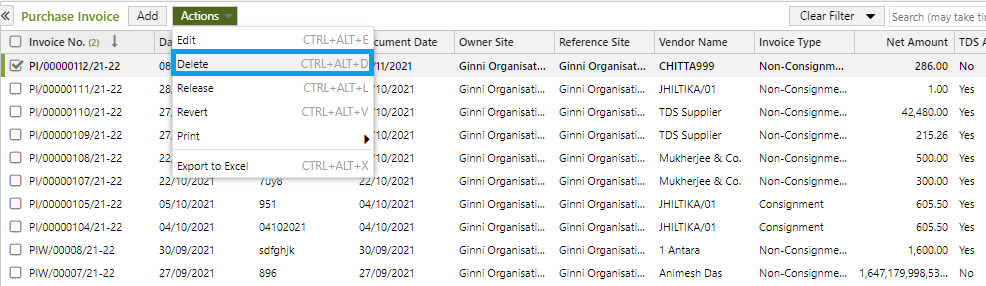
- You will get a message - "Document once deleted cannot be retrieved. Do you want to delete this document?"
- If you click on Yes, you will get a confirmation message "<Purchase Debit No::> - Successfully deleted".
Prerequisites
- The users' role must have access to the Release app operation in the Purchase Invoice feature in Procurement - Operation - Invoicing through Roles in Ginesys Web - Admin - Security.
- Purchase Invoice must be created and Un-Posted.
- Purchase Invoice must not be Released.
Step-by-step guide
The steps are as follows:
- Go to Ginesys Web > Procurement > Operation > Invoicing > Purchase Invoice.
- Purchase Invoice window will open.
- Previously created Purchase Invoice will be listed.
- Select the PI you want to release.
- You can use Filter to search particular PI(s).
- Go to Acton > Release.
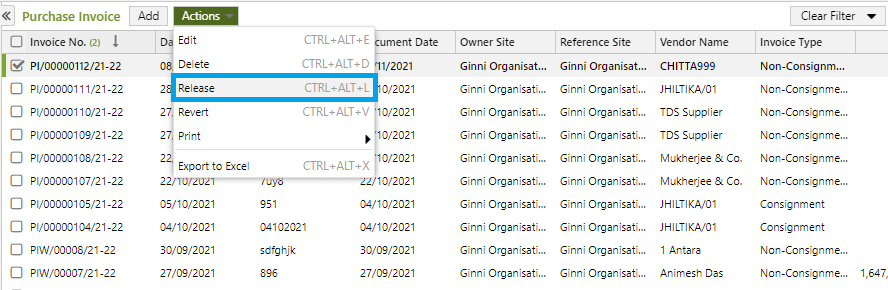
- You will get a message - "Document(s) once released cannot be modified. Do you want to proceed?"
- If you click on Yes, you will get a confirmation message "Debit No <Purchase Debit No:> - Released Successfully ".
Prerequisites
- The users' role must have access to the Revert app operation in the Purchase Invoice feature in Procurement - Operation - Invoicing through Roles in Ginesys Web - Admin - Security.
- Purchase Invoice must be created and Un-Posted.
- Purchase Invoice must not be Released.
Step-by-step guide
The steps are as follows:
- Go to Ginesys Web > Procurement > Operation > Invoicing > Purchase Invoice.
- Purchase Invoice window will open.
- Previously created Purchase Invoice will be listed.
- Select the PI you want to release.
- You can use Filter to search particular PI(s).
- Go to Acton > Revert.
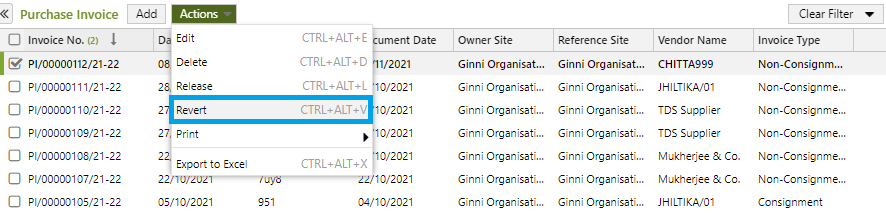
- You will get a message - "Finance postings of the selected document(s) will be reverted. Auto DN/CN, if any, will also be deleted. Do you want to proceed?"
- If you click on Yes, you will get a confirmation message "Invoice No. <Purchase Debit No:> - Reverted Successfully ".
Prerequisites
- The users' role must have access to the Revert app operation in the Purchase Invoice feature in Procurement - Operation - Invoicing through Roles in Ginesys Web - Admin - Security.
- Purchase Invoice must be created.
- Printer must be connected to the device.
Step-by-step guide
The steps are as follows:
- Go to Ginesys Web > Procurement > Operation > Invoicing > Purchase Invoice.
- Purchase Invoice window will open.
- Previously created Purchase Invoice will be listed.
- Select the PI you want to print.
- You can use Filter to search particular PI(s).
- Go to Acton > Print.
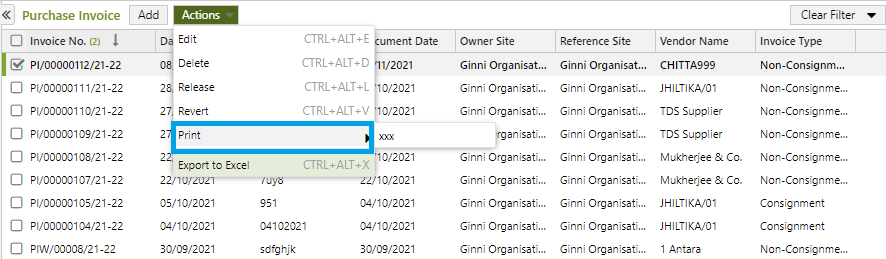
- You will get previously created template.
- Click on the required template to print.
- A new window will open.
Click on the Print to print the Purchase Invoice.
Note: You can print using Print Preference.
TDS deduction on Services was formerly allowed in Ginesys, now with new statutory changes being put in place through TDS Section 194Q - deduction of TDS on purchase of goods worth more than fifty lakh rupees (₹ 50,00,000) has been enabled. Please note the following major points as encapsulated in the section194Q -
- Buyer is responsible for the deduction.
- The deduction is applicable for the purchase of any goods of value INR 50 Lakhs or more in any financial year. Note that the total purchase value of the transactions throughout the year should be INR 50 Lakhs or more for the deduction to be applicable.
- Deduction is of 0.1 per cent. of such sum exceeding fifty lakh rupees, as income tax.
- Deduction has to be made at the time of providing the money to the seller through credit of such sum to the account of the seller or at the time of payment thereof by any mode, whichever is earlier.
Earlier, TDS deduction on Services was reflected only in Service Invoice. But from now TDS deduction is also available on Goods, so it will be reflected in Purchase Invoice also.
Changes in Purchase Invoice
INTRODUCTION OF THE TDS INFORMATION BLOCK
A new block name as TDS Information is introduced under General Information in Purchase Invoice
The TDS Information block contains four fields as ‘TDS Applicable', ‘TDS Source’, ‘TDS Name’, 'TDS Section’.
All the above field values populate on a selection of Vendor Name.
TDS Name field displays only non-extinct Goods type of TDS, from vendor master if tagged, otherwise from TDS section definition.
DERIVATION OF TDS RATE
TDS Rate gets derived based Vendor Amount i.e. sum of TDS Applicable amount from Purchase Invoice, TDS Journal and TDS Reversal entries, w.r.t. the TDS name.
TDS Rate gets fetched from two places - Vendor master and TDS Section definition.
If Vendor Amount + TDS Applicable Amount of Invoice <= Maximum Limit specified in Vendor master, then TDS Rate gets fetched from the Vendor master Exception details.
Else, gets populated from the TDS Section definition.
- Example: If Vendor Amount <= Exception Limit 50L, then TDS @ 0%. Else if Vendor Amount > 50L, then TDS @ 0.1%.
CREATION OF TDS JOURNAL
If Purchase Invoice is TDS Applicable then during Release from the list view and edit mode -
If TDS entry is not found then creates TDS Journal entry. The TDS Amount gets auto-adjusted with the Invoice Amount.
If TDS entry is found then opens prompt to adjust the TDS Amount with the Invoice Amount.
Note:
TDS Applicable Purchase Invoice cannot be released without adjusting the TDS Journal amount.
REFLECTION IN CHARGE VIEWS
Charge Details window opened from the Charge Summary block contains a new field named 'Include in TDS'. This field contains a dropdown list having two values - Yes/No.
By default, the value populates from Purchase Term.
The field remains editable for change in the Purchase Invoice document.
REFLECTION IN PANEL INFORMATION
In ‘Item Summary' section, TDS related information has been added - ‘TDS Applicable Amount’, ‘TDS Charge Amount’, ‘TDS Net Amount’, ‘TDS Rate’, 'TDS Amount’.
REFLECTION IN LIST VIEW
New columns have been added to the list view for - 'TDS Applicable', 'TDS Amount', 'TDS Source', 'TDS Name' and 'TDS Section'.