We’re excited to announce that the latest information is now available on our new site, the Ginesys One Wiki!. Visit the site for up-to-date resources and insights. We look forward to continuing to support you there!
We’re excited to announce that the latest information is now available on our new site, the Ginesys One Wiki!. Visit the site for up-to-date resources and insights. We look forward to continuing to support you there!
How To: Create an application pool on a Web server
Application pools are required to isolate sites and applications to address dependability, accessibility, and safety issues. Creation of applications pools should be considered for any one of the following reasons:
- To group sites and applications that run with the same configuration settings.
- To isolate sites and applications that run with unique configuration settings.
- To increase security by using a custom identity to run an application.
- To prevent resources in one application from accessing resources in another application. For example, ISPs might create individual application pools for each customer's sites and applications. Separating customer content in this manner can prevent one customer's resources from accessing resources on another customer's site, even though both customers' sites are on the same Web server.
- To improve performance by separating unstable applications from well-behaved applications.
Step-by-step guide
An application pool can be created on a Web server by using the user interface (UI) :
Open IIS Manager.
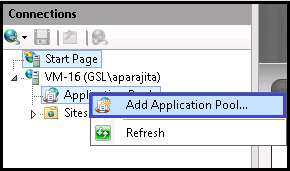
In the left hand side Connections pane, expand the server node and click Application Pools.
Right click the Application Pools, and click Add Application Pool.
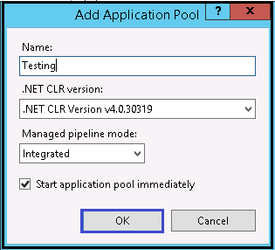
On the Add Application Pool dialog box, type a name for the application pool in the Name box.
From the .NET Framework version list, select the version of the .NET Framework required by the particular managed applications, modules, and handlers. Or select No Managed Code if the applications that are run in this application pool do not require the .NET Framework. GINESYS requires .Net Framework 4.6 or above which can be downloaded from Common Downloads.
From the Managed pipeline mode list, select one of the following options:
Integrated, if the integrated IIS and ASP.NET request- processing pipeline is to be used.
Classic, the IIS and ASP.NET request-processing modes are to be utilized separately. In classic mode, managed code is processed by using aspnet_isapi.dll instead of the IIS 7 integrated pipeline.
Select Start application pool immediately to start the application pool whenever the WWW service is started. By default, this is selected.
Click OK.

