We’re excited to announce that the latest information is now available on our new site, the Ginesys One Wiki!. Visit the site for up-to-date resources and insights. We look forward to continuing to support you there!
We’re excited to announce that the latest information is now available on our new site, the Ginesys One Wiki!. Visit the site for up-to-date resources and insights. We look forward to continuing to support you there!
Managing Master Policy through Ginesys POS Management
- Deepankana Roy (Unlicensed)
- Subhasree Banerjee (Unlicensed)
- Debrupa Datta (Unlicensed)
- Aparajita Basu Roy
.Policy Site Policy Master Policy. Master Policy settings are general settings that are made for all stores. They are the same across all stores of an organization. It has two (2) tabs - User Settings and System Settings.
- The User Settings relate to the various forms used in Ginesys POS like -
- Common
- Delivery Slip & POS Bill
- Goods Receive & Return
- Other Bills
- POS Orders
- System Settings on the other hand relate to -
- Automation of -
- Synchronization process,
- Backup process,
- Application update process,
- Settlement process
- OTP Configuration
- Services Applicable
- Integrations Required
- Promotion Applicability
- POS Functional Behavior..........and more.
- Automation of -
This article will describe how to manage Master Policy in Ginesys HO.
Prerequisites
- The users' role must have access to the Master Policy feature by enabling Add / Modify app operation for the feature in Admin - Security - User - Role through POS Management - Setup - Manage.
Step-by-step guide
The steps are as follows:
- Go to POS Management > Setup> Manage > Master Policy.
- Master Policy window will open.
- Policy window will open.

You will get two tabs - User Settings and System Settings.

- Allow back dated entry up to (in days) - It allows users to entry the Back Dated data in store if HO provides the value which is greater than zero (0). If the provided value is zero (0), then it will not allow users to entry any Back Dated data. If HO does not provide any value (Null), then the users can entry any Back Dated data.
Negative stock checking mode - If the stock of an item is not available, then the user will get a Negative Stock warning message.
Negative Stock Check will be applied and based on what value is specified for it in the Item definition / User Profile. Item definition for Negative Stock Check can be set to Profile, Warn, Ignore or Stop. User Profile for Negative Stock Check can be set to Warn, Ignore or Stop.
Important information
The priority of User Profile logic is more than Item Definition logic; in other words, if the value of Negative stock check is Stop in Item Definition and Negative stock check value is Ignore in User Profile, then for a negative stock of that particular item, the entry of the particular document will not stop & the user can save the entries; but a user with a profile which is set to Warn will receive an alert while a profile set to Stop will prevent the saving of the same.
Suppose Negative stock check value for Item - A001 is set to Stop in Item Definition and Negative stock check value is Ignore in User Profile of the user. Then if A001 goes into negative stock, the user will find that the entry of the particular document will proceed normally.
Setting Effect
Ignore User will get to know nothing if stock goes to negative
Warn User will get a warning / and may choose to ignore or cancel.
Stop User will not be able to proceed.
To illustrate,
- Stock-in-hand – 10
- Issued quantity – 25
- Received quantity – 12
- Negative Stock check is set to Warn in both User Profile and Item Definition.

- Allow blind session closure - If the value of the policy set as Yes, it allows user to close a session without entering opening and closing amount for the current POS session in emergency situation.
- Allow to run drawer summery report - If the value of the policy set as Yes, it allows to run drawer summery report for the current POS session after closing a session.
- Validity of credit notes (issue against POS bill) in days - Number of days the credit note, issued against POS bill, would remain valid.
- Validity of credit notes (issue against other bill) in days - Number of days the credit note, issued against other bill (Gift Voucher bill etc.), would remain valid.
- Display transaction rate - If this policy value set as Yes, then the users will be allowed to view rate of items and amount values at various back office transaction modules.
- Accept quantity in multiple of sale factor only - If this policy value set as Yes, then during any transaction, the users will be forced to accept quantity of items in multiple of sale factor specified in Item definition. If it is not specified, then the component units of the item can be billed in any quantity irrespective of sale factor.
For example, suppose Item A001 has three components to it - a tiffin box, a water-bottle and a carrying bag and has a sale factor of 3. But if this policy does not have any specific value; the three components of A001 (the tiffin box, the water-bottle and the carrying bag) may be sold separately as distinct items.

- Number of copies of Sale Bill to print - POS will automatically print the specified number of copies of a Sale (no return item present) Bill i.e. total number of bills printed would be the number of copies +1 (the original). In simpler terms, if the value for this policy is 2, then a total of (2+1= 3) bills would be printed.
- Number of copies of Return / Exchange Bill to print - POS will automatically print the specified no. of copies of a Return / Exchange (any return item present) Bill i.e. total number of bills printed would be the number of copies +1 (the original). In simpler terms, if the value for this policy is 2, then a total of (2+1= 3) bills would be printed..
- Number of copies of Delivery slip to print - POS will automatically print the specified no. of copies of a Delivery Slip i.e. total number of Delivery Slip printed would be the number of copies +1 (the original). In simpler terms, if the value for this policy is 2, then a total of (2+1= 3) Delivery Slips would be printed.
- Allow item level discount - If this policy value set as Yes, then the users will be allowed to give the Item Level discount.
- Allow Bill level discount - If this policy value set as Yes, then the users will be allowed to give the Bill Level discount.
- Maximum allowable discount percentage - User will be allowed to provide manual discount (Item/Bill level) up to the specified percentage.
- Maximum allowable discount amount - User will be allowed to provide manual discount (Item/Bill level) up to the specified amount.
- Allow to clear promotion - If this policy value set as Yes, then the users will be allowed to clear/resume both item level & bill level promotions.
- Allow adhoc return without sale bill reference - If this policy value set as Yes, then the users will be allowed to return item without sales bill as reference.
- Sale person tagging mandatory - If this policy value set as Yes, then users will be restricted from saving the bill/delivery slip if sales person is not tagged in any Item.
- Customer selection mandatory for POS bill - If this setting set as Yes, then customer must be mentioned in each bill.
- Bill expiry for item return (in days) - Bill will expire after the specified number of days from its creation date and it will not be considered for return purpose.
- POS return reason entry required - If this policy value set as Yes, then user will be forced to provide a reason while taking a return for any item in POS Bill. The return reason will be configured and synced to POS by HO.
- Allow cash refund - If this policy value is set as Yes, then it allows the user to refund cash to the customer in exchange of items returned. Otherwise, the cashier will only issue the credit note at the time of returning an item.
- Allow price overwrite - The users will be allowed to edit price of a bill item.
- Allow to change the auto adjust credit note amount - If this policy value set as Yes, then the users will be allowed to modify the automatically adjusted credit notes' amount in case of POS Order tagging in POS Bill.
- Allow back dated reprints for POS bill up to (in days) - Users will not be allowed to take back dated reprints of POS bills after specific number of days.
- Allow to add customer in POS bill modification after settlement - If this policy value set as Yes , users will be allowed to be add customers through POS Bill Modification for accumulating loyalty points for the bill. In the rush hour, it is impossible to fill the customer details in the time of billing. user just entry the contact number of the customer and ask him to fill his basic details in a form. From this policy, HO allow user to entry the customer's remaining details provided by the user even after settlement of POS bill.
- Allow mode of payment modification - If this policy value set as Yes, the user will be allowed to modify the mode of payments. In the rush hour it is impossible to take the whole card details from the customer. If HO allowed to modify the Mode of Payment, the the user can update the Mode of Payment details.
- Allow to void POS bill in which the credit note was issued - Users will be allowed to Void the POS Bill against Credit Note issued if this policy value set as Yes.
- Void Bill reason entry required - If this policy value set as Yes, then on voiding POS Bill, users have to provide Valid Reason.
- Void Delivery Slip reason entry required - If this policy value set as Yes, then on voiding Delivery Slip, users have to provide Valid Reason.
- Allow void bill printing - If this policy value set as Yes, users will be allowed to print void bill.
- Allow void delivery slip printing - If this policy value set as Yes, users will be allowed to print void Delivery Slip.
- Trade group to be applied in case of the customer GST state is different from store state - If selected "LOCAL”, then for the customer with different GST state from Store GST state system directly applies LOCAL trade group GST tax charges and will NOT consider customer GST state as counter-party GST state. If selected "INTERSTATE", then for the customer with different GST state from Store GST state system directly applies INTERSTATE trade group GST tax charges and will consider customer GST state as counter-party GST state. If selected "PROMPT USER", then for the customer with different GST state from Store GST state system warns the user to confirm to apply required GST tax charges(LOCAL or INTERSTATE) and consider (or) not a customer GST state as counter-party GST state.
- Customer Selection is Mandatory at Delivery slip - If this policy value set as No, customer selection is not mandatory for Delivery Slip.
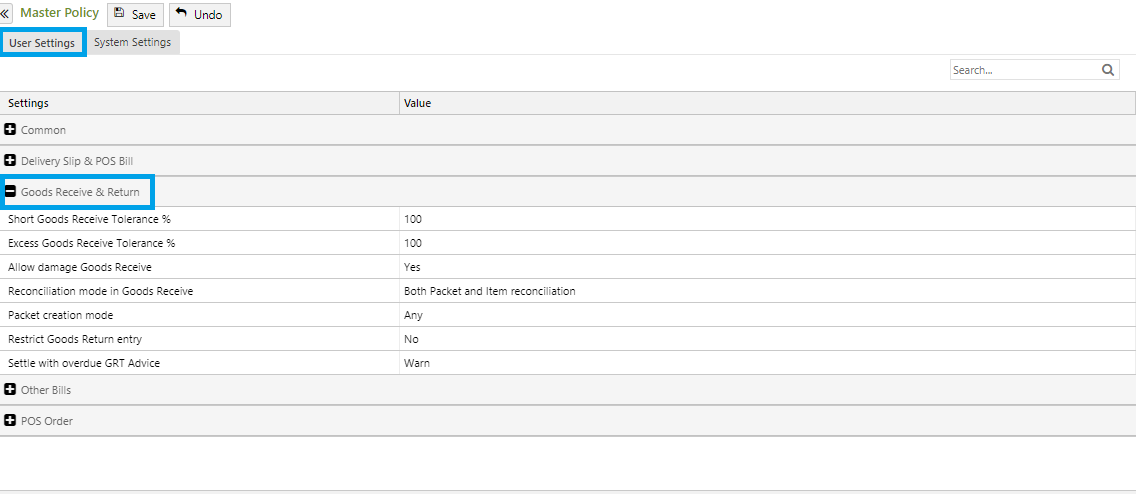
- Short Goods Receive Tolerance % - Users will be allowed to make short entry up to specified tolerance %. (To know more please Click Here)
- Excess Goods Receive Tolerance % - Users will be allowed to make excess entry up to specified tolerance %. (To know more please Click Here)
- Allow damage Goods Receive - User will be allowed to receive damage quantity in Goods Receive Document if this policy value set as Yes. In such cases, it is essential to define the Damage Goods Stock Point at POS during GRC.
- Reconciliation mode in Goods Receive - Depending upon the accuracy required for item quantity reconciliation mode is selected -
- If Both Packet and Item reconciliation is selected then the user will be allowed to reconcile packets and also have to enter item quantity manually (or) scan items with quantity population as a manual mode in goods receive-item reconciliation.
- If Only Item reconciliation with manual entry is selected then the user will be allowed only to perform item reconciliation with an option to enter item quantity manually or scan items with quantity population as a manual mode in go.
- If Only Item reconciliation without manual entry is selected then the user will be allowed only to perform item reconciliation but without an option to enter item quantity manually or scan items with quantity population as a manual mode in goods receive. Also for import barcode file system will not allow importing barcode data with quantity values from a file.
- Packet creation mode - This setting allows HO to decide the packet creation modes - Adhoc, Against GRT Advice or Any.
- Restrict Goods Return entry - HO can restrict the goods returned by the site; usually applicable for Outright stores.
- Settle with overdue GRT Advice - If overdue GRT Advice are found at the time of Settlement by a store, then its behavior would be decided by this policy. The options available here are - Allow, Warn and Stop. Allow will let the Settlement proceed irrespective of any overdue GRT Advice. Warn will provide alert message before it lets user proceed with Settlement but Stop will block the settlement from occurring.
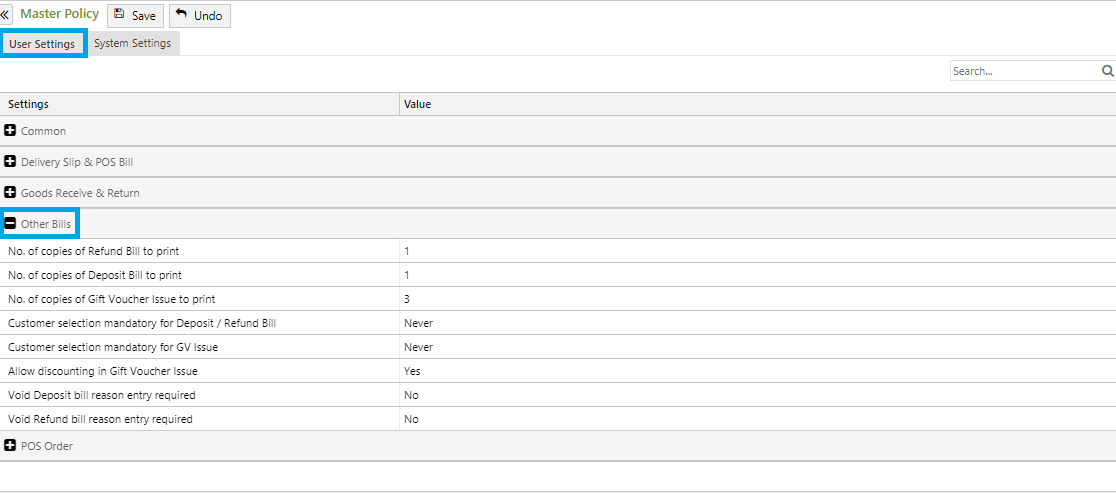
- Number of copies of Refund Bill to Print - System will automatically print the specified no. of copies of a Refund Bill. It is a mandatory field. If user requires the printing of Refund bills, then at least a value of 1 has to be assigned.
- Number of copies of Deposit Bill to print- System will automatically print the specified no. of copies of a Deposit Bill. It is a mandatory field. If user requires the printing of Deposit bills, then at least a value of 1 has to be assigned.
- Number of copies of Gift Voucher Issue to print - System will automatically print the specified no. of copies of a Gift Voucher Bill. It is a mandatory field. If user requires the printing of Gift Voucher bills, then at least a value of 1 has to be assigned.
- Customer selection mandatory for Deposit / Refund bill - Customer selection is mandatory to preserve data integrity and to provide customer satisfaction.
- If Always option is selected then customer selection will be mandatory for every bill.
- If Never option is selected then customer selection will not be mandatory.
- If Only when credit note is issued option is selected then customer selection will be mandatory when credit note will be issued.
- Customer selection mandatory for GV issue - Customer selection is mandatory to preserve data integrity and to provide customer satisfaction.
- If Always option is selected then customer selection will be mandatory for every gift voucher.
- If Never option is selected then customer selection will not be mandatory.
- If Only when credit note is issued option is selected then customer selection will be mandatory when credit note will be issued.
- Allow discounting in Gift Voucher issue - Users will be allowed to issue Gift Voucher at discounted value if this policy value set as Yes.
- Void Deposit Bill reason entry required - Users will be forced to provide a reason for voiding the Deposit Bill if this policy value set as Yes.
- Void Refund Bill reason entry required - Users will be forced to provide a reason for voiding the Refund Bill if this policy value set as Yes.
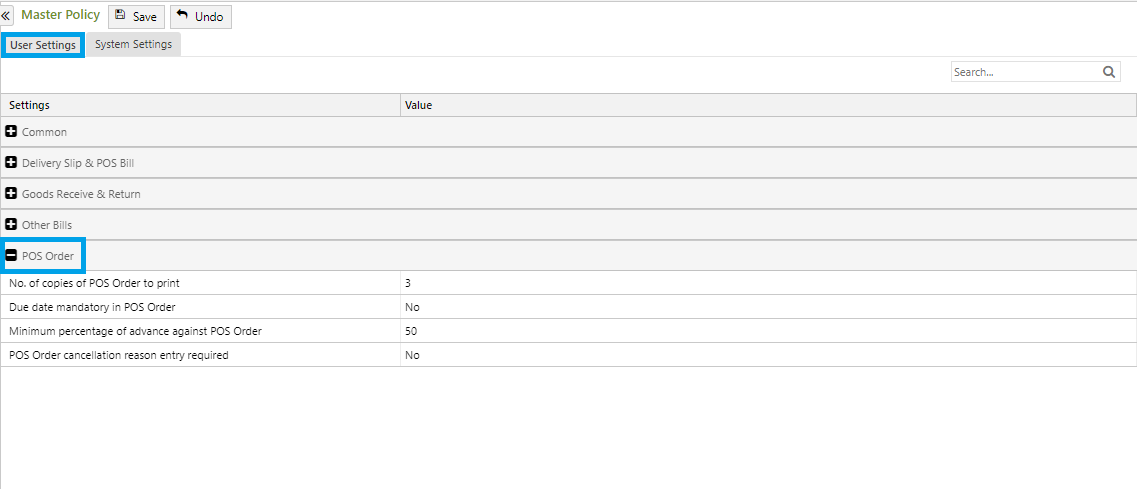
- Number of copy of POS order to print - System will automatically print the specified no. of copies of a POS Order.
- Due date mandatory in POS Order - Users will be forced to provide due date in POS Order if this policy value set as Yes.
- Minimum percentage of advance against POS order - Users will not be allowed to save POS Order if specified percentage of order value is not received as Advance from the customer.
- POS Order cancellation reason entry required - If this policy value set as Yes, then the users will have to provide a reason for cancelling the POS Order.
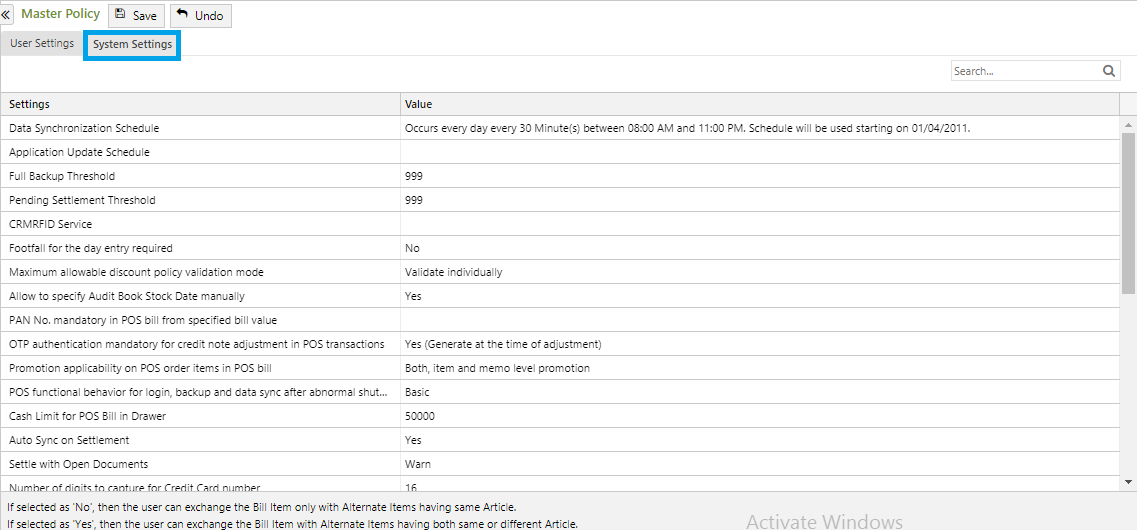
- Data Synchronization Schedule - Data synchronization will take place as per specified schedule.
- Application Update Schedule - Application update will take place as per specified schedule.
- Full Backup Threshold - From this policy HO can set maximum allowable days without full backup POS can run.
- Pending Settlement Threshold - HO can set maximum possible unsettled days in this policy.
- CRMRFID Service - HO can enable or disable integrated RFID Service for Loyalty Cards.
- Footfall for the day entry required - Footfall is the number of customers who visit the store per day. Ho can decide the store will count the Footfall number or not. If the value set as Yes then it will be counted otherwise not.
- Maximum allowable discount policy validation mode - If
- Allow to specify Audit Book Stock Date manually - Users will be allowed to enter and modify Book Stock Date in Audit Journal if this policy value set as Yes.
- PAN no is mandatory in POS bill for specified bill value - User will be asked to tag a customer (with PAN No.) if the bill value is equal to or more than the provided value.
- OTP authentication is mandatory for credit note adjustment in POS transaction - This will enable or disable OTP validation at the time of credit note adjustment in POS transactions.
- If Generate at the time of adjustment
If Generate at the time of issue is selected then the OTP will be generated at the time of issue of credit note. - If No is selected then OTP will not be generated.
- If Generate at the time of adjustment
- Promotion applicability on POS order item in POS bill - System will apply promotions on POS order items in POS bills (at the time of delivery) as per the setting done here.
- If Both, item and memo level promotion is selected then promotion will be applicable on both item and menu level.
- If Only item level promotion is selected then promotion will be applicable on item level only.
- If Only memo level promotion is selected then promotion will be applicable on memo level only.
- If Do not apply is selected then promotion will not be applicable on any level.
- POS functional behavior for login, backup, data sync after abnormal shut down - From this policy HO decides the POS function behavior after abnormal shut down. There are two options in the drop down list -
- Cash Limit for POS Bill in Drawer - User will be asked to drop the cash if the total cash value in the drawer is equal to or more than the provided value.
- Restrict cash transactions of and above <specify value> - The system will restrict the cashier in POS bill & Deposit bill from receiving cash of and above the specified value.
- Auto Sync on Settlement - Sync will get executed automatically on Settlement if this policy value set as Yes. Otherwise users can execute a manual sync or wait for next scheduled automatic sync.
- Settle with Open Documents - Action to perform by the site when open documents found while settling a date.
- If Ignore is selected then system will ignore any open document and complete the settlement.
- If Warn is selected the system will warn user about open document and let the user choose whether the settlement should be completed or not.
- Stop is selected the system
- Number of digit to capture for Credit Card number - From this policy HO decide how many digits are allowed to enter for credit card number.
- Item Service - To view stock point wise item stock in POS.
- Allow Bill value rounding - If this policy value set as Yes, then the users can rounded of the bill value from a decimal value.
- Custom loyalty point redeemer - Loyalty points will be redeemed as per the custom method if defined.
- Rounding behavior in POS bill - Rounding behavior in POS bill can be configured using this policy.
- If Upper is selected then system will take the upper rounded value of decimal.
- If Lower is selected then system will take the lower rounded value of decimal.
- If Round is selected then system will take the nearest rounded value of decimal.
- Rounding limit in POS bill - This policy would round the bill value by adding/subtracting the value defined in the policy by HO.
- Email Domain for Email2SMS Service Provider - HO decides which Service Provider will work on the particular site. Currently, only we are working with Textlocal.in
- Display item image at POS based on - Users will be shown Item Image at store end as per the configuration done here.
- Default behavior for auto-start data sync scheduler service post DB Backup - If selected 'Yes' then the system will auto-start data sync scheduler service upon successful POS DB backup. If selected as 'NO' then the system will NOT auto-start data sync scheduler service upon successful POS DB backup.
- Allow POS Bill for a customer with GSTIN details - User will be allowed to make bills for the customers with GSTIN information present. If set as “No”, the system would not allow the user to select the customer with GSTIN, instead, it will prompt the cashier and populate the customer without GSTIN.
- Loyalty Service provider - On selecting Easemyretail option EMR based third-party loyalty solution will get applicable. On selection of Ginesys option, Ginesys loyalty program will get enabled. By default this will be selected.
- Coupon Service provider - On selection of Easemyretail (EMR) option, EMR based third-party coupon solution will get applicable. On selection None option, no coupon can be applied to the bill.
- Easemyretail (EMR) Document Handling Services - If this policy value set as Yes, bill submission to EMR will take place .If the value set as No, no bills will be submitted to EMR.
- Allow exchange of item other than same Article - If selected as 'No', then the user can exchange the Bill Item only with Alternate Items having same Article.
If selected as 'Yes', then the user can exchange the Bill Item with Alternate Items having both same or different Article. - OTP SMS Suffix - Value/Text provided here will be appended with the existing OTP SMS template.
- POS E-Invoice -
- If Non Integrated is selected then then user need to manually generate and update the IRN details against the document.
- If EaseMyGST (EMG) is selected user can generate or cancel E-Invoice just on click of a button.
POS OTP messages (SMS) with Brand Name (or any other prefix) configuration is available from version 12.4.0 onwards.
- Change the Value as per requirement in the Value column from the User Settings and System Settings tabs.
- Click on Save & Close button to save the policies.
You will get a message -"Record Saved Successfully".
To set up the settings "Display item Image at POS based on" and "Item Service", you need to configure Web API first.
To go back to the main page click on the link: How To: Manage Setup in Ginesys Retail