mO SharemO Share

Adding, Editing & Deleting Job Receipt in Ginesys Web

Job Receipt is raised when goods are received from production unit, either based on a Job Order or on an adhoc basis. A job receipt is used in the second stage of a manufacturing process of a manufacturing organization. A Job Receipt is raised for every process involved in the production of the item and it is given to the jobbers involved in each of the process. If there are multiple jobbers involved in a single process then a Job Receipt will be raised for each of the jobbers.

The stock position of the production and consumption items are affected in their respective stock points after a Job Receipt is created. This article describes how to manage Job Receipt in Ginesys Web.

 Add Job Receipt

Prerequisites

  1. The users' role must have access to the Job Receipt feature by enabling Add app operation for the feature in Admin - Security - User - Role through Production - Operations - Process Job Receipt.
  2. Assembly Items must be present in the item master.
  3. Processes must be present in the process master.
  4. Stock Point must be present.

Step-by-step guide

The process is divided in the following steps:

  1. Go to Ginesys Web > Production > Operations > Process > Job Receipt
  2. Job Receipt module list view will open. 
  3. Previously created receipts will be listed here.
  4. Click on the Add button. 
  5. Add: Job Receipt window will open.
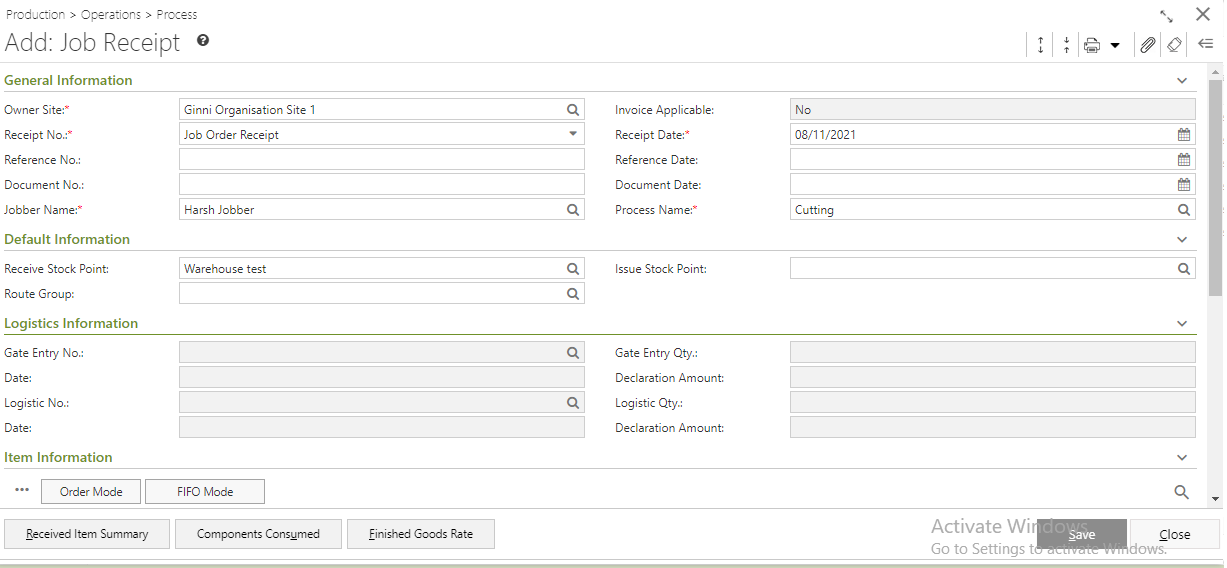
  6. You will get a group of icons at the top right corner of the window.
  7. The icons name from left to right are - Expand All, Collapse All, Delete, Cancel, Print Document Report, Clear Form and Open Side Panel.
    1. Expand All: Clicking on this icon, all the sections (General, Service Details, User Defined Fields and Others) will be Expand if they are collapsed.
    2. Collapse All: Clicking on this icon, all the sections will be Closed if they are expanded.
    3. Attachment: 
    4. Print Document Report: Clicking on the Down Arrow beside this icon, you will get Print Preference option with already created Report File Templates. This option is used to print document reports.
    5. Clear Form: Clicking on this icon, you can Clear all the data already entered. 
    6. Open Side Panel: Clicking on this, you will get the details of the current Job Receipt as follows:
      1. Document Summary:  In this section you will get the summary of Service Count, Ordered Quantity & Amount, Invoiced Quantity & Amount, Created & Modified by etc. 
      2. Jobber Details: You will get the Selected Vendor Details like Address, Contact Details, Tax Region, GST Details etc.
      3. Jobber Statistic: This section describes the Ledger balance amount, Outstanding Amount, Last Order Date etc. 
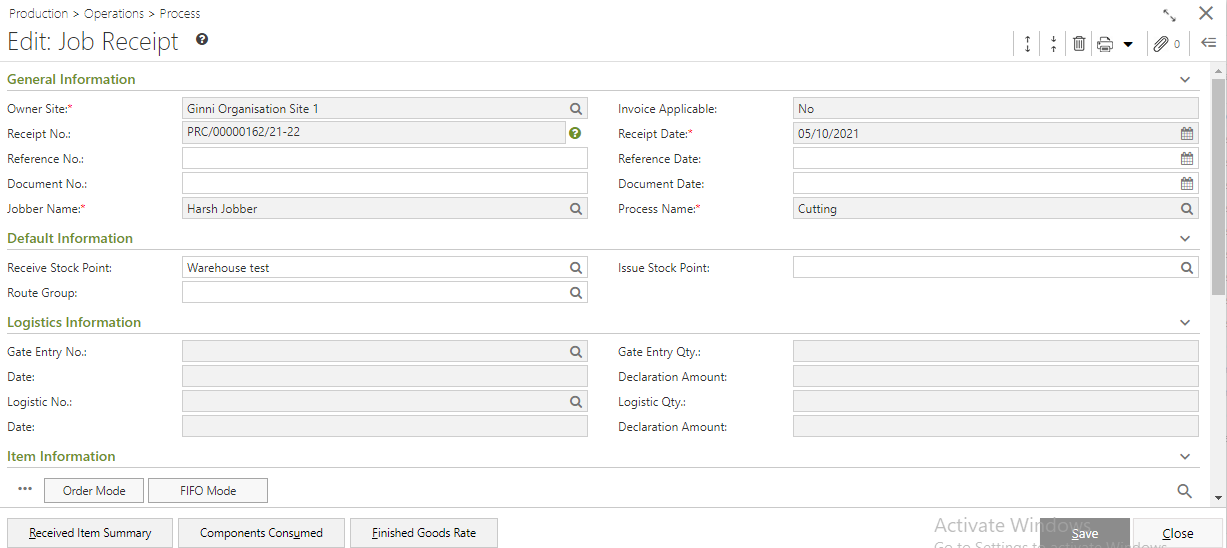
  8. You will get six sections - General Information, Default Information, Logistic Information, Item Information, and Others.
  9. General Information:

    1. Owner Site (Mandatory Field): It will be populated automatically as per the connected site. You can change the site from the lookup window. 
    2. Select the Receipt No. (Mandatory Field).
    3. In the Receipt Date (Mandatory Field) field the system date will be populated automatically.
    4. Select the Jobber Name(Mandatory Field) from the lookup window by clicking on the Search icon ().
    5. Select Process Name (Mandatory Field)from the lookup window by clicking on the Search icon ().
    6. Give Documentation No .
    7. Select the Reference Date and Documentation Date
    8. Invoice Applicable field will be disabled and its default value will be No.
  10. Default Information: 

    1. Receive Stock Point & Issue Stock Point will be populated as per Jobber Name selection.
    1. Select the Route Group from the lookup window by clicking on the Search icon ()
  1. Logistic Information:

    1. Some fields will be auto-populated as per the selected Jobber Name. 
    2. Provide values for the remaining fields.
  2. Fill the Item Information area:

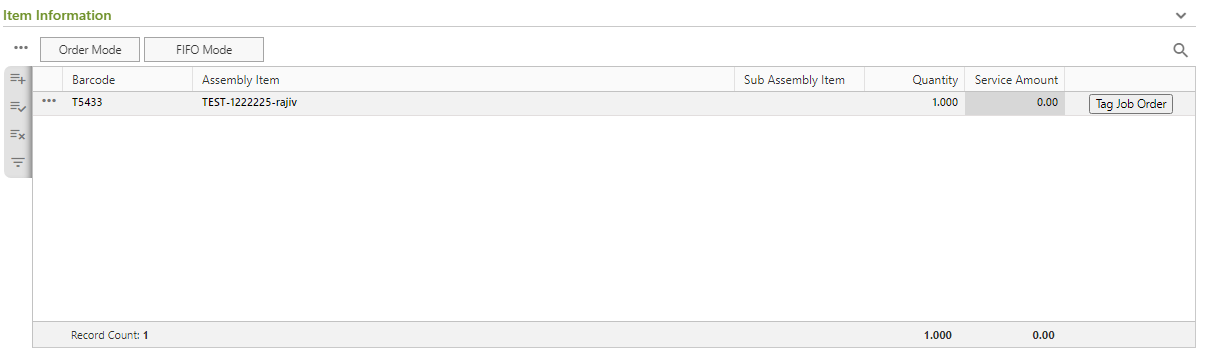
    1. You will get mode for item selection - Order Mode, FIFO Mode and Alternate Mode.
    2. Order Mode:
       
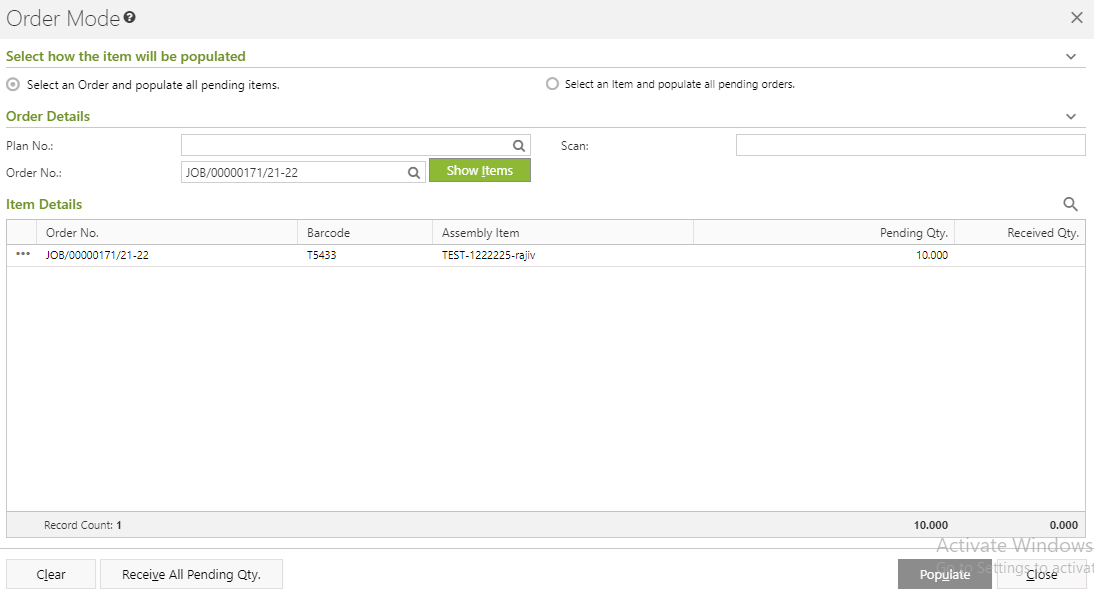
      1. Click on the Order Mode.
      2. Order Mode window will open.
      3. You will get two options - Select an Order and populate all pending items and Select an Item and populate all pending orders.
        1. Select an Order and populate all pending items:
          1. You need to select Plan No. and Order No.
          2. Click on the Show Items button.
          3. Items will be listed in the Item Information section as per selected Plan.
        2. Select an Item and populate all pending orders: 
          1. You need to put the Scan no of item.
          2. The item will be populated.


    3. FIFO Mode:

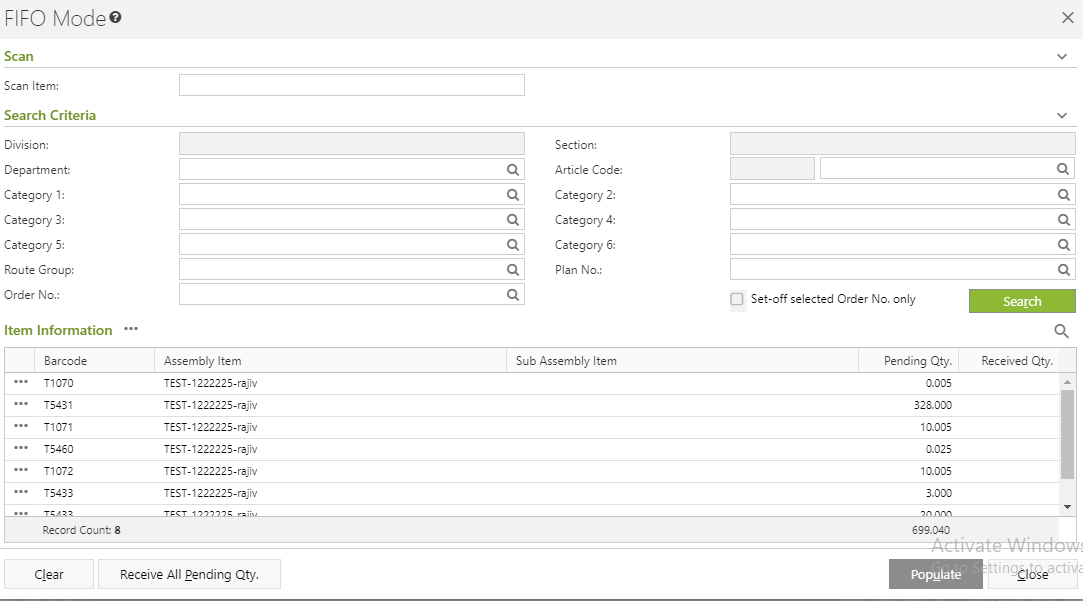
      1. Click on the FIFO Mode.
      2. FIFO Mode window will open.
      3. Put in the Search Criteria.
      4. Items will be populated.

          • Workflow

          • After populating items in the item detail grid

          • On clicking Populate:

            • Check whether Orders have been adjusted on FIFO basis contains items where consider-in-WIP = 'Y' then item to get populated in main window as per existing behavior.

            • If Orders have been adjusted, contains at least one Item where consider-in-WIP = 'N'

              • Open a window - (Batch & Serial Details) will open for creation/selection of batch/serial with items

              • For behaviour follow: https://ginesys.atlassian.net/wiki/spaces/DEV/pages/3735846965 with few exceptions as below:

                • Under batch detail tab,

                  • Delete row option not to be provided.

                  • New column to be included Assembly Barcode, Assembly Item, Sub- Assembly Item and Inventory Management (with Assembly Item column non-hideable )

                  • Assembly Barcode wise - Sub-assembly item wise - Batch/Serial no. wise unique records to be populated.

                • Under Serial detail tab,

                  • Left section have new columns as Assembly Barcode, Assembly Item, Sub- Assembly Item and Inventory Management (with Assembly Item column cannot be hidden )

                  • Under left section, delete row option not to be provided.

        • Item selection via item grid LOV

          • Workflow

            • Selection of item via LOV and then tagging job order against it in Tag Job Order window

            • On clicking OK

              • For job orders with items where consider-in-WIP = 'Y' then item to get populated in main window as per existing behavior..

              • If at least one Job Order with Items where consider-in-WIP = 'N' (i.e; only applicable where receive item type = Finished goods)

                • Open a window - (Batch & Serial Details) will open for creation/selection of batch/serial with items

                • For behaviour follow: https://ginesys.atlassian.net/wiki/spaces/DEV/pages/3735846965 with few exceptions as below:

                  • Under batch detail tab,

                    • Delete row option not to be provided.

                    • New column has been included Order No., Plan No., Assembly Barcode, Assembly Item, Sub- Assembly Item and Inventory Management (with Order No., Assembly Item column non-hideable )

                    • Order number wise - Plan No. wise - Assembly Barcodewise - Sub-assembly item wise - Batch/Serial no. wise unique records to be populated.

                  • Under Serial detail tab,

                    • Left section have new columns as Order No., Plan No., Assembly Barcode, Assembly Item, Sub- Assembly Item and Inventory Management (with Order No., Assembly Item column non-hideable )

                    • Under left section, delete row option not to be provided.

          • NOTE: Behaviour for Tag job order window

            • Where items populated from Order/FIFO/Alternate mode and for which batch information exists in item grid, then do not allow to modify Order no. from tag job order window and Qty. in right side

              • Batch/Serial information window will not open for items where batch information exists in item grid.

        Note: Batch/Serial number already selected for the Assembly item should not be displayed again. (Same batch/Serial number for a given item cannot be selected in multiple rows)

        • On Save Validation:

          • If the selected Assembly item is Batch/Serial wise managed and Batch/Serial information is not found, then

            • Restrict save with Display message, “Batch/Serial information is found missing for some assembly items. Please provide.”

          • If the selected Component items consumed is Batch/Serial wise managed and Batch/Serial information is not found, then

            • Restrict save with Display message, “Batch/Serial information is found missing for some component items consumed. Please provide Component Consumed window.


    4. Alternate Mode:

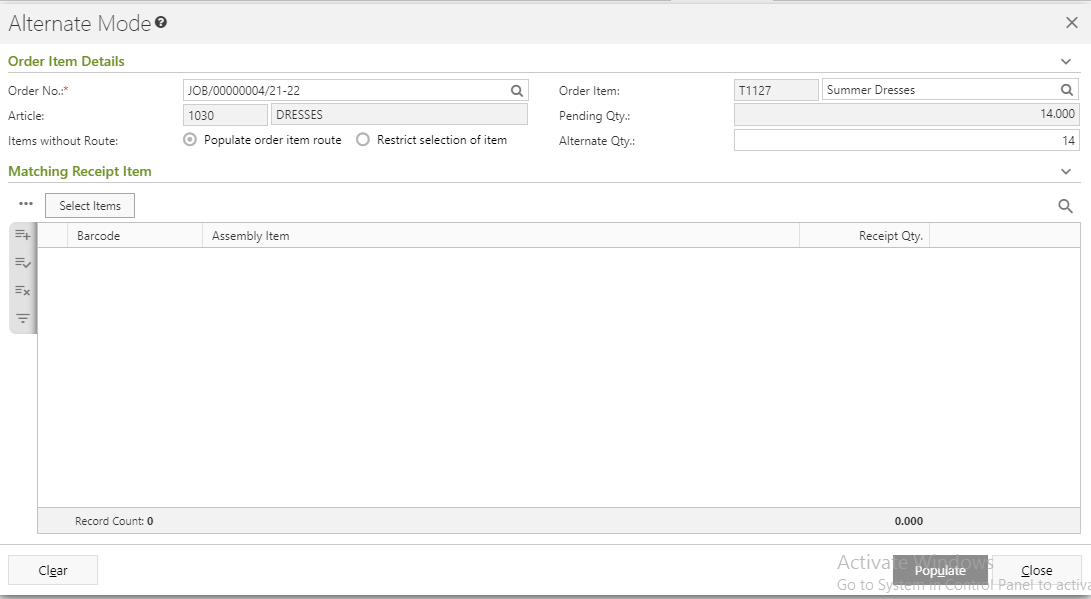
      1. Select the Order No.
      2. Put Alternate Quantity. 
      3. Select Matching Item. 
      4. Click on Populate button. 
  3. You can put in the Remark .
  4. Click on Save button in the menu bar to save the Job Receipt. 

    • New columns have been added in the grid - Batch/Serial No. | Mfg. Date | Valid Upto

    • Column will remain hidden by default,

    • All column types are “View only”, i.e. modification is not allowed.

    • Position: Column have been added after ‘Sub-Assembly item’.

    • Behaviour:

      • Values are displayed as populated from the various Item selection modes.

      • Modification is not allowed, once the row is populated in main item grid
        Use case: if user wants to change the batch number, he need to delete the row and re-add

    • Data displayed to be made hyperlink

      • On clicking on the record(having value), popup window to be displayed

      • Batch Detail window on item scan to be opened in display mode.

      • Window will display details of Batch/Serial information for the respective batch

    • Grouping Logic:

      • Assembly Barcodewise - Sub-Assembly Item wise - Batch/Serial No. - Service Amount wise unique records to be populated.


 Edit Job Receipt

Prerequisites

  1. The users' role must have access to the Job Receipt feature by enabling Modify app operation for the feature in Admin - Security - User - Role through Production - Operations - Process Job Receipt.
  2. Job Receipt must be created and not posted.

Step-by-step guide

The process is divided in the following steps:

  1. Go to Ginesys Web > Production > Operation > Process > Job Receipt.
  2. Job Receipt list view will open.
  3. Select an existing plan you want to edit and click on Edit in the Action Button drop-down.
  4. The selected job receipt will open. 
  5. You can modify according to your requirement.
  6. Some fields like Owner Site, Receipt No, Jobber Name, Invoice Applicable, Receipt Date, Process Name and all the fields of Logistic Information can only be filled at the time of creation of Job Receipt. Other fields are editable.
  7. Click on Save button in the menu bar to save the modified job receipt. 


 Delete Job Receipt

Prerequisites

  1. The users' role must have access to the Job Receipt feature by enabling Delete app operation for the feature in Admin - Security - User - Role through Production - Operations - Process Job Receipt.
  2. Job Receipt must be created and not posted.

Step-by-step guide

The process is divided in the following steps:

  1. Go to Ginesys Web > Production > Operation > Process > Job Receipt.
  2. Job Receipt list view will open.
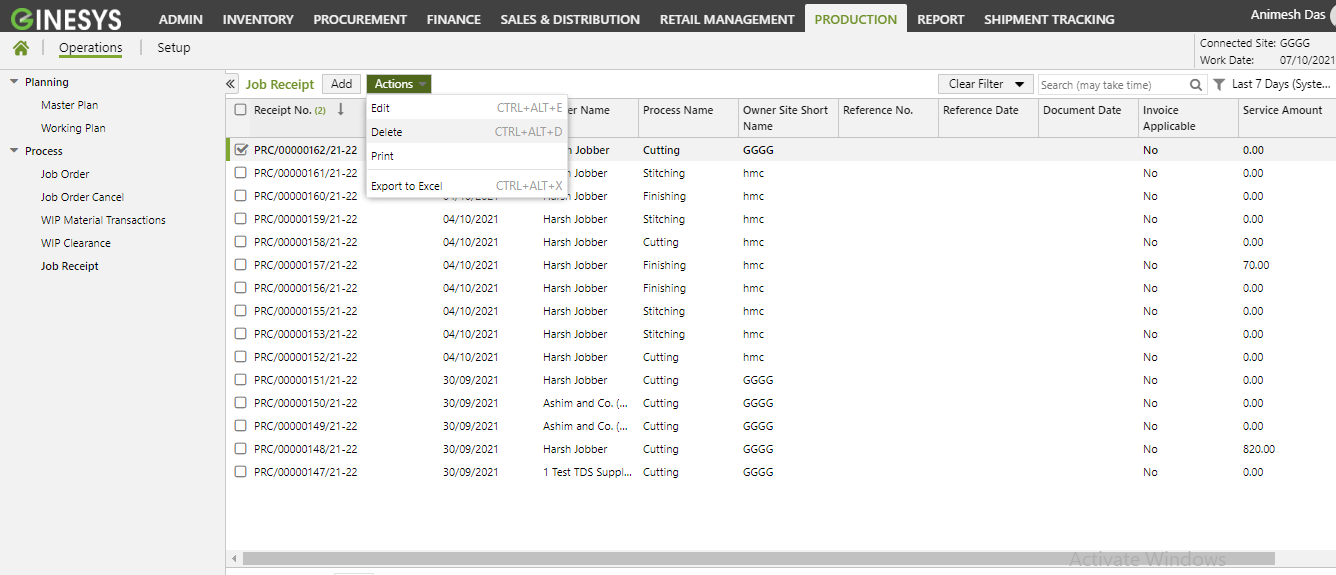
  3. Select an existing plan you want to delete and click on Delete in the Action Button drop-down.
  4. A popup window will open .Click on yes button to delete the Job receipt. 
  • Changes Done

    • New column has been included ' Inventory Mgmnt', ‘Batch/Serial No.’, ‘Mfg. Date’ and 'Valid upto'.

    • Position: Column has been added after component item.

    • Grouping logic

      • Previously Order No. wise - Plan No. wise - Assembly Item wise - Component item wise actual consume qty check was there

        • Now, grouping logic to also include Batch No. wise

    • Behaviour:

      • Column will remain hidden by default,

      • Except for Batch/Serial No. column, all columns to remain Display only i.e. disabled.

      • Inventory Management column- display as ‘Item wise'/ ‘Batch wise’/ 'Serial wise’ respectively for each item.

      • Batch/serial No. column includes an LOV.

        • LOV contains all batch/serial no. w.r.t the component item contained in the line that has been issued and pending to be consumed. [WIP = (Issue - Return - Wastage - Consumed quantity)]

Workflow

  • By default the component has been consumed on FIFO basis of stock available in WIP with the respective Jobber for the respective component item (as existing)

  • For component items for which Batch/Serial is not applicable ( flow to remain as existing)

  • For component items for which Batch/Serial is applicable,

    • An option to add row ‘copy row for different batch’ to be provided at each line level for the purpose of assigning a different batch/serial no. for components consumed

      • For the line from which it is copied, a new line gets inserted just below it with all the information to remain same except for ‘Batch/serial No.’ and ‘Actual consumed quantity’ which will be copied as blank.

      • All existing validation w.r.t quantity consumption should now include batch/serial no. wise in.

      • Behaviour to remain same as usual in both ‘add’ and ‘edit’ mode. (i.e, after saving of job receipt user now wishes to change its batch/serial no. for the consumed qty.)

  • On clicking OK

    • If all information is correct, redirect to main window (as existing flow)

    • If the selected component item is Batch/Serial wise managed and Batch/Serial information is not found, then

      • Restrict with a message, “Batch/Serial information is found missing for some items. Please provide.”

    • All existing validations like Quantity cannot be greater than Issued Qty i.e. Issued - Return - Wastage - Previously consumed qty.

      • Now all Batch/Serials are combined for respective component item for which batch/serial is applicable.