/
How To: Customize Document Report in GINESYS Desktop
We’re excited to announce that the latest information is now available on our new site, the Ginesys One Wiki!. Visit the site for up-to-date resources and insights. We look forward to continuing to support you there!
We’re excited to announce that the latest information is now available on our new site, the Ginesys One Wiki!. Visit the site for up-to-date resources and insights. We look forward to continuing to support you there!
How To: Customize Document Report in GINESYS Desktop
This article describes how to customize the Document Report in the Report Template according to the company's requirements. To make the changes please follow the given path:
GINESYS Desktop > Admin > Utilities > Document Settings > Report Template.
Step-by-step guide
| Changes to be made in the Template | Changes reflected in the Document Report |
|---|---|
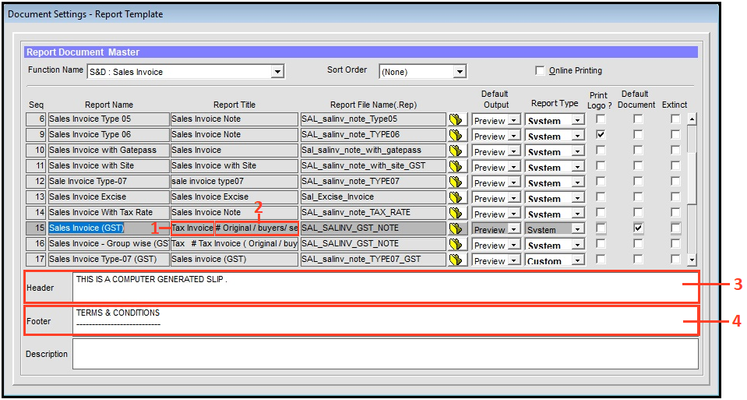
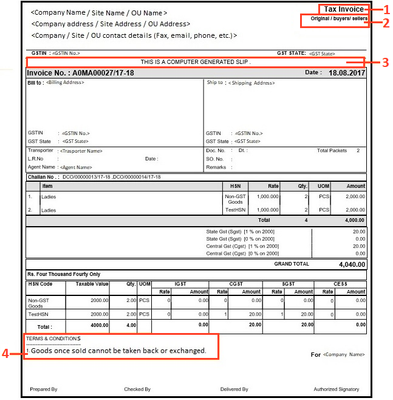
Fig. 1 | Fig. 2 |
The process involves the following steps:
Provide the desired title in the Report Title field as shown in the area marked as 1 in Fig. 1. It will be displayed in the Document Report (Fig. 2) also marked as 1.
- If you want to display any other information along with the title, then put a ‘#’ beside the title and write the information as shown in the area marked as 2 in Fig 1. It will be displayed in the Document Report (Fig. 2) in the area also marked as 2.
- Provide Header information in the space provided (marked as 3) in Fig 1. This is a text field. Any information present here will be displayed in the Document Report in the area marked as 3 in Fig. 2.
- Like the Header information section, the Footer information section (marked as 4 in Fig.1) too is a text field. This section is generally used to display information like the 'Terms and Conditions' as seen in the area marked as 4 in Fig 2.
- In case you want to make other changes in the Document Report, contact GINESYS Helpdesk.
Related articles
, multiple selections available,
Related content
Understanding Backup Location required in Ginesys HO Backup utility
Understanding Backup Location required in Ginesys HO Backup utility
Read with this
Managing the Report Templates in Ginesys
Managing the Report Templates in Ginesys
More like this
How To: Configure SMS notification in Ginesys HO and POS
How To: Configure SMS notification in Ginesys HO and POS
Read with this
Managing Report-Server
Managing Report-Server
More like this
How To: Update Ginesys HO using Auto Update
How To: Update Ginesys HO using Auto Update
Read with this
Managing Report-Home
Managing Report-Home
More like this

